

Creating a Yelp Business page allows businesses to connect with their customers and offer them ways to learn more about the location, look at the menu and services, post their pictures of the experience, and leave reviews. But just how important is Yelp?
As it turns out, it’s huge. Yelp ranks second in our online reviews statistics for sites that consumers will check before they visit a business, and customer reviews data shows 97% of people make a purchase after visiting Yelp. So if you haven’t claimed and optimized your Yelp Business pages, now is the time to do so.
Fortunately for you, we created this comprehensive guide that includes everything from claiming a page to utilizing ads on Yelp. Scroll down to check out the guide in its entirety or select a section from the table of contents below.
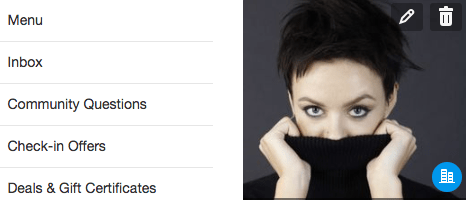
Table of Contents
-
- Categories
- Photos
- Videos
- Menu Listings
- Services
- Hours
- History and Manager/Owner Descriptions
- Business Highlights
- Portfolio Showcase
- Messages
- NAP Information
- SEO Benefits
- Yelp Health Score
- Service Areas
- Check-In Offer
- Yelp Guest Manager
- Yelp’s Transaction Platform
- Yelp Reservations
- Calls to Action
- Yelp Verified Status
- Yelp Deals and Gift Certificates
- Yelp’s Eat24 for Business
- Reviews
Claim/Create Your Yelp Business Page
The first step for any brand on Yelp is to claim an existing Yelp business page or create a new one from scratch. You’ll also need to verify ownership or management of the business in question before you can use the business page to its full potential.
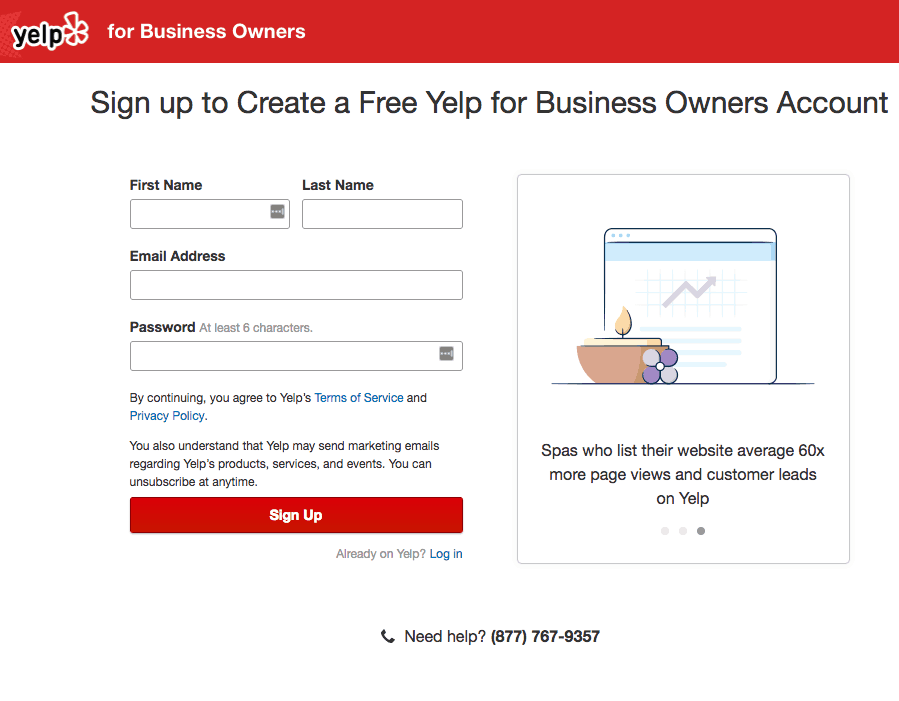
Set Up Your Yelp Business Account
A regular Yelp user account won’t do when it comes to managing a Yelp business page. For that, you’ll have to create a new account in the Yelp for Business Owners website.
- Click on the “Sign Up” button on the top-right corner of the Yelp for Business Owners home page.
- On the next screen, you’ll enter personal information including your first and last name, email address, and password. When you’re done, click the “Sign Up” button.
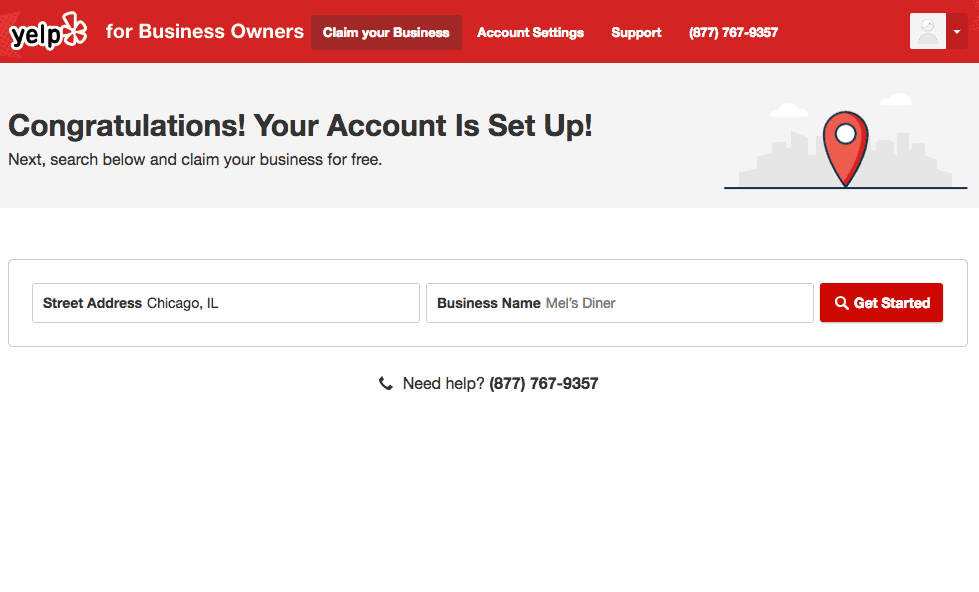
- With your account created, you’ll see a screen similar to the Yelp for Business Owners home page, which asks you to enter the business address name in the search bar to begin the claiming process.
How to Claim Your Yelp Business Page
Sometimes, Yelp will already have a page for the business in its database, which means you won’t need to make an entirely new listing. Instead, you should claim the existing entry.
-
- Type in the business street address and name in the search bar on the Yelp for Business Owners home page. If you just claimed your Yelp Business account, you should see the same search bar on the confirmation page.
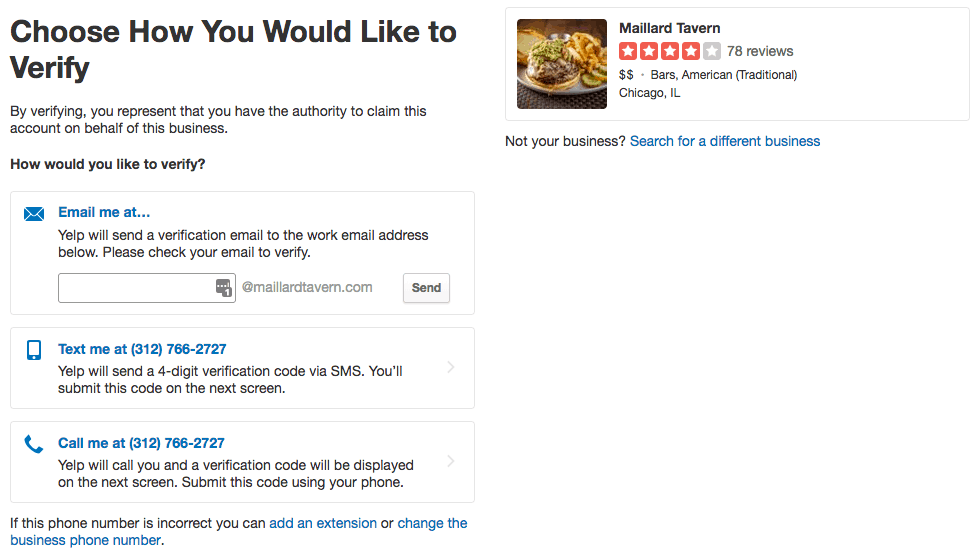
- A list of businesses should appear that are near the address or share a similar name. If you see your business, click on the red “Claim This Business” button next to the listing.

- You’ll need to verify that you are authorized to claim the listing for the business. You can tell Yelp to send you a verification message at a work email address, send a four-digit verification code to the business phone number, or call that same number with the code.
- Type in the business street address and name in the search bar on the Yelp for Business Owners home page. If you just claimed your Yelp Business account, you should see the same search bar on the confirmation page.
How to Claim a Yelp Business Listing in Bulk/Multiple Locations
If your business has multiple locations, you’ll need to first claim one location. From there, you can add additional locations under the same account.
- Click on the “Account Settings” tab at the page and head to the “Account Information” section.
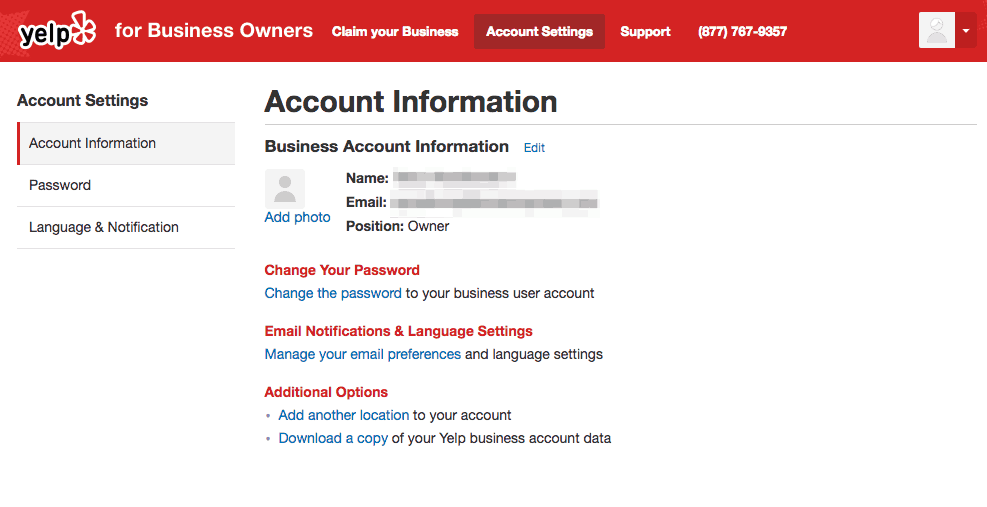
- Under the “Additional Options” section is a link to add other locations to your account. Click on that to begin the claiming process for your other locations.
Why Some Yelp Business Pages Can’t Be Claimed
In some cases, you won’t be able to claim specific listings. This is due to one of two scenarios:
- The page was recently submitted and is currently in the approval process.
- The page was already claimed by a colleague.
If the page was claimed by someone outside the business, you’ll need to find out who they are and ask them to add you as an additional user to that business account. As a last resort, you can also contact Yelp’s Support team for help in potentially resolving the issue.
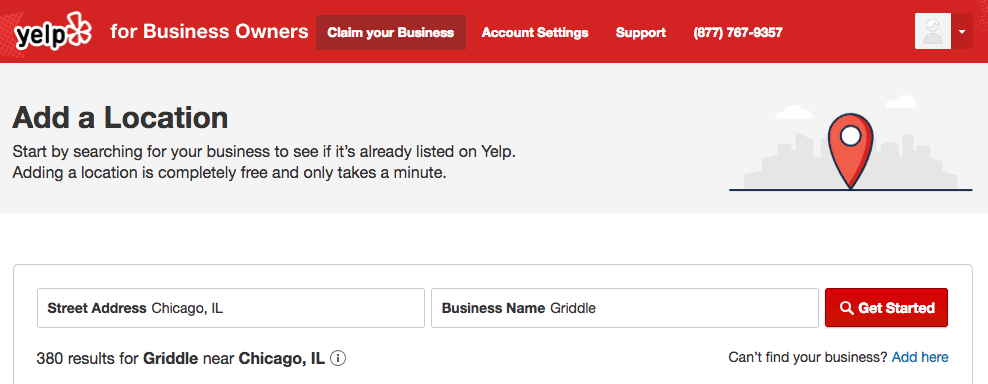
How to Create a Yelp Business Page
Before making a new business page make sure that the business doesn’t already exist in Yelp’s database.
You can do this by typing in the name and address in the search bar on the Yelp for Business Owners home page.
- If the business name isn’t listed, click on the “Add Here” button underneath the search bar.
- You will go to another screen where you will have to fill out business information including its name, address, phone number, website, and operating hours.
- Yelp will need to verify the business and it also needs to be approved by Yelp moderators.

If it is approved, you’ll get an email with further instructions on how to claim the page for your business account.
Fill Out Your Yelp Business Pages
You’ll need to add multiple pieces of information to your Yelp business page such as:
- Services provided
- Categories
- Menu listings (for specific businesses)
Each piece of information helps users make an informed decision when comparing similar businesses, and it can also make your page more attractive to other users.
How to Add a Business Category on Yelp
It isn’t enough to just define a business simply as a restaurant or in the automotive industry. Yelp says that categories should be as specific as possible and that they should “describe the primary activities of the business rather than the entire scope of the business’ activity.”
Yelp allows up to three categories. More Yelp categories are added every quarter (currently over 1,200), which means that you can change categories at any time.
- Go to the “Business Information” section on your Yelp for Business Owners account and click the “Add another category” link to make the appropriate category changes.
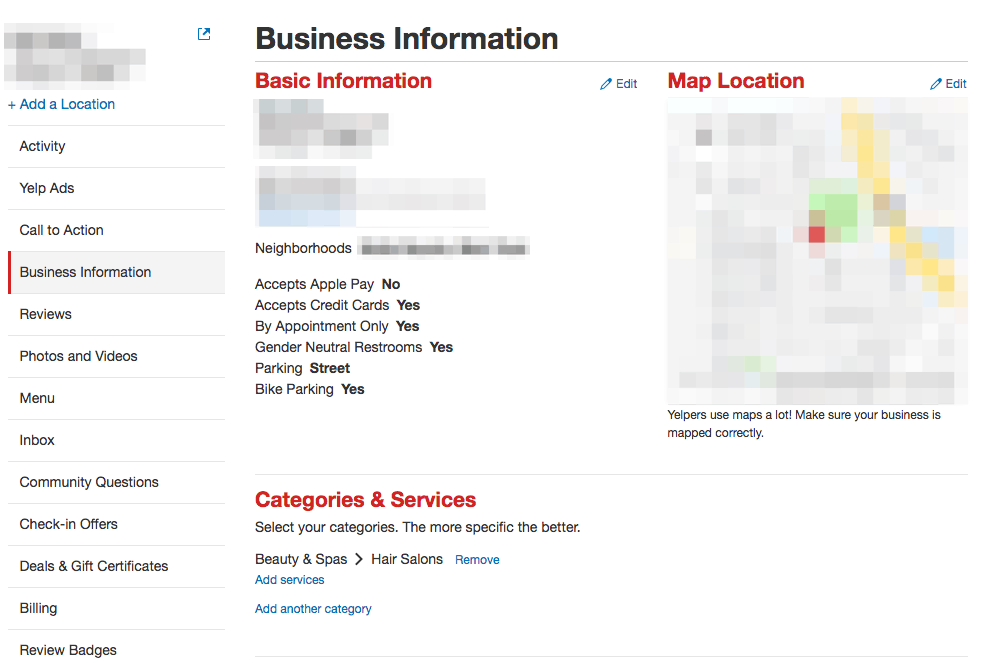
- Click the “Save Changes” button when you’re done.
How to Add, Change, and Delete Photos on Yelp Business Pages
Photos can tell consumers many things about the brand — from highlighting specific products and services to showing a sneak peek of the business’ interior. Adding the right photos can make a business more attractive to potential customers.
- Upload photos by going to the “Photos and Videos” section within the Yelp for Business Owners site.
- Click on the “Upload Photos” button to add images to your Page. There doesn’t seem to be a limit to how many photos you can add, but each one must be smaller than 5,000 x 5,000 pixels.
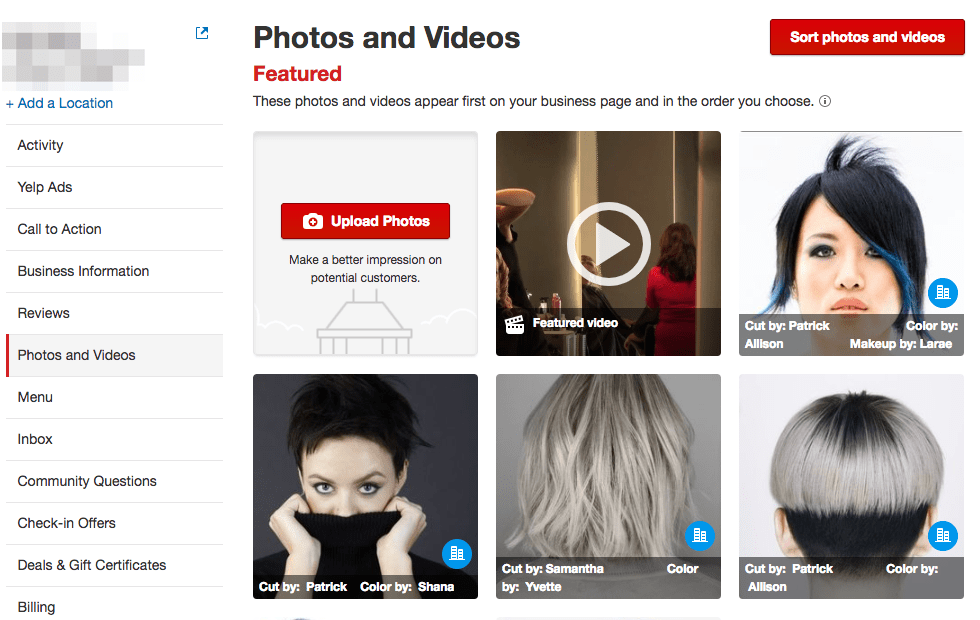
You can also delete any photos you uploaded to the page. However, this doesn’t mean that you can delete images uploaded by Yelp users. Only the person that uploaded the photo in question can delete it.
- Go to the “Photos and Videos” section on Yelp for Business Owners to see all the media content you uploaded to your page.
- Hover the desired image. You should then see a trash can icon. Click it to delete the image from your page.
In addition to content photos, you should also add a profile picture to your Yelp Business Account, which requires approval by Yelp before you can learn how to respond to negative reviews and positive feedback.
- Go to the “Account Settings” tab at the top of the Yelp for Business Owners page and click on the “Account Information” section.
- If you haven’t added a profile picture yet you’ll see a silhouette of a person underneath the “Business Account Information” header. Click on the “Add photo” link below the silhouette. You can also click the “Change Photo” button if you want to update your profile with a new image.
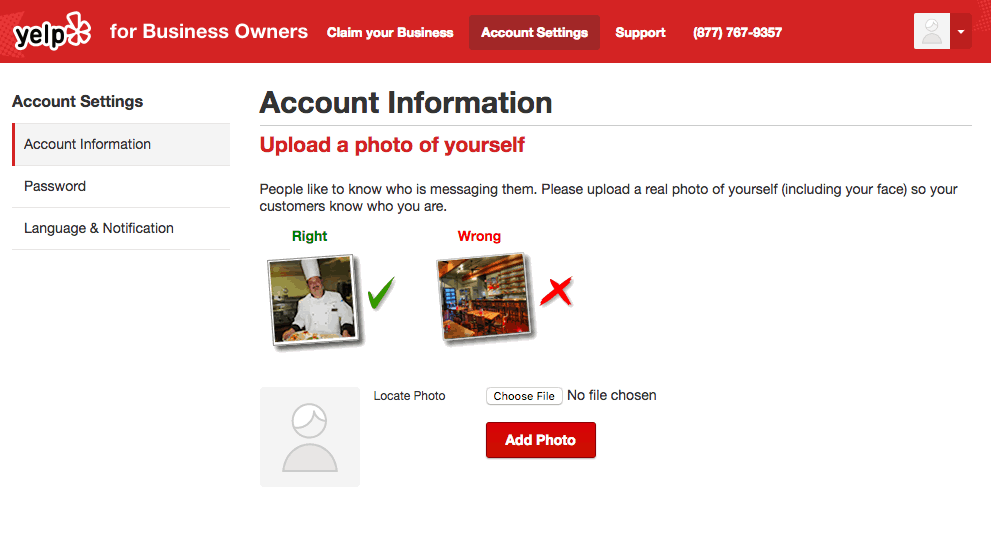
- Upload a photo from your computer and then press the “Add Photo” button when you’re done. Yelp says that your profile picture should be a clear photo of the person representing your business. Otherwise, it won’t be approved and you’ll need to find a new image.
Yelp Business Videos
As a Yelp for Business owner video is vital not just for your brand reputation, but customer acquisition efforts. A well-made video showcasing the customer experience can help set expectations before customers walk in the door.
You can upload a video business so long as it’s part of your current ad package on Yelp. Specifically, it shows up as a “featured video” add-on through the Yelp Ads program, but you will need to contact your Customer Success Manager for further information. Their contact information is located in the “Billing” section of your Yelp for Business Owners account.
Yelp says that you can’t send them links to the video if it’s hosted on YouTube or other video streaming websites. You’ll need to send the actual video, which shouldn’t exceed 500 MB. Furthermore, the video content shouldn’t last longer than two minutes. Yelp accepts video files in .mp4, .wmv, .mov, and. avi formats.
You can also have Yelp produce a video for you, but that also requires you to request it as part of Yelp Ads. Yelp uses two video vendors for video production, and you’ll need to contact them for additional information, questions, and pricing. They are:
- SmartShoot (877) 559-9898
- StudioNow (615) 577-9400
Your standard Yelp user can also upload their own videos of a business through the mobile app. They can press the “Take video” button, which is within the “Add photo” link on a Yelp page, and then tap the red circle on the screen to start recording footage.
Edit, Post, and Correct Yelp Menu Listings
If you are managing a restaurant brand, it’s important to know how to edit your menu on a Yelp business account. Yelp will automatically import menu data for businesses that have menus on the Eat24 and SinglePlatform databases. It should be noted that Eat24 is now part of Grubhub, but the Eat24 brand is shutting down at some point in the future.
Those without an Eat24 or SinglePlatform account can still add a menu to their Yelp page by copy and pasting a link of the menu from their own website.
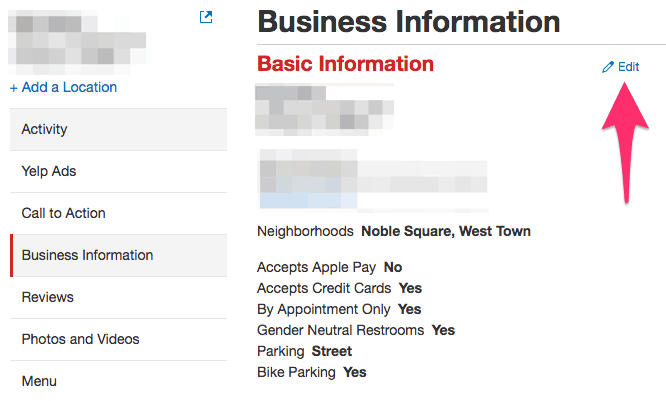
- Sign in to the Yelp for Business Owners site and click on the “Your Business” tab on top of the page.
- Go to the “Business Information” section and click on the “Edit” link next to the “Basic Information” section.
- Paste the menu link from the business’ website into the text field labeled “Services Web Address” or “Menu Web Address.”
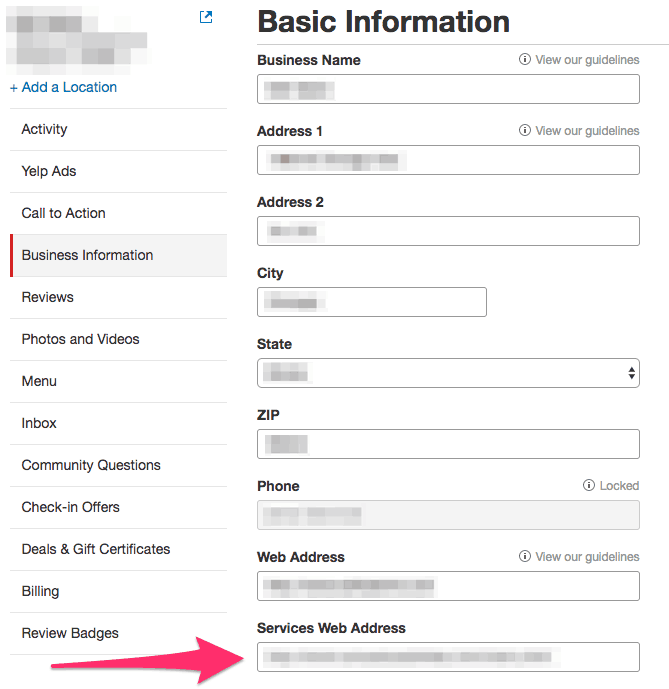
- Click “Save Changes” at the bottom of the page to confirm your changes. Yelp will review the changes to make sure it’s correct and accurate.
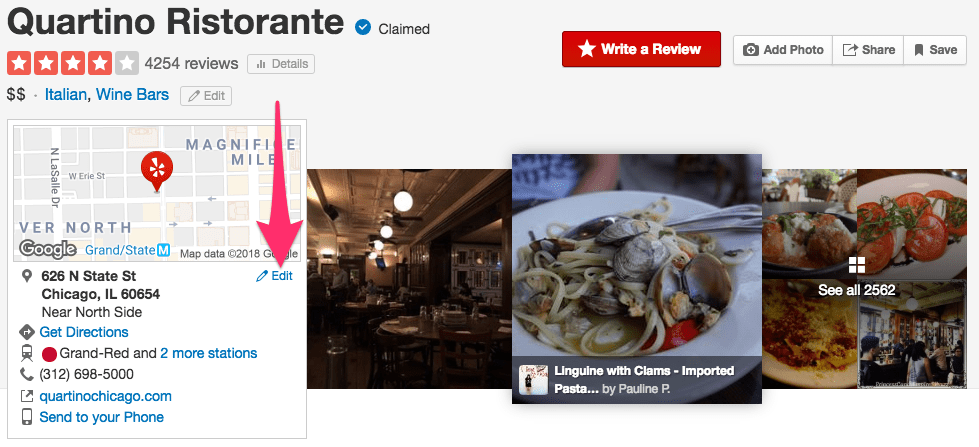
Yelp users can also suggest edits and corrections. One way to do so is through the general information card, which is below the rating on a Yelp page.
- Click on the “Edit” link on a Yelp page’s general information card.
- A separate page will open, and you can add the right menu URL in the “Menu Web Address” text field.
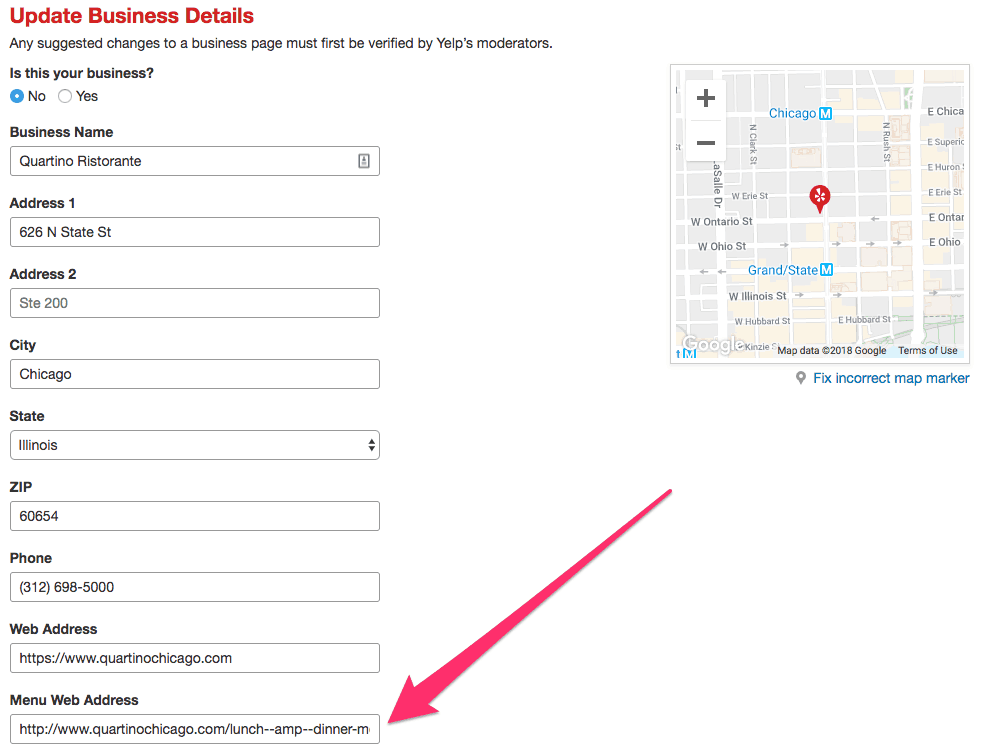
- Click “Submit Changes” when you’re done.
Another option for users is to go to the “Menu” section on the right-hand side of the page. From there, they can view the full menu on Yelp and tell Yelp about any errors on the current menu.
- On the menu section of a Yelp page, click on the “View the full menu” link. This will take you to a separate page that contains the business’ full menu.
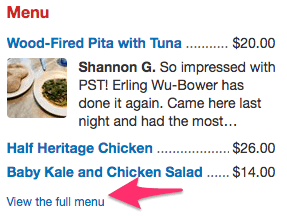
- Scroll to the bottom of the page. A “Submit corrections” link should appear above the site footer section. Click the link to leave feedback.
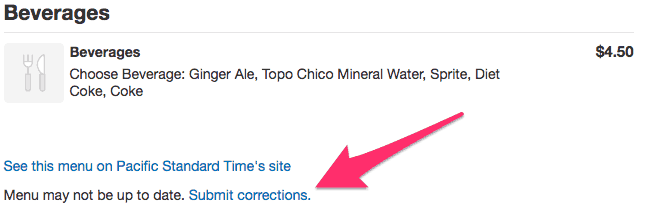
- You can either select the “Items incorrect/offered” or the “Wrong menu for this business” option in the dropdown menu that appears. You can leave additional text feedback to make it easier for Yelp moderators to see the incorrect menu information.

- Click “Send Feedback” when you’re done.
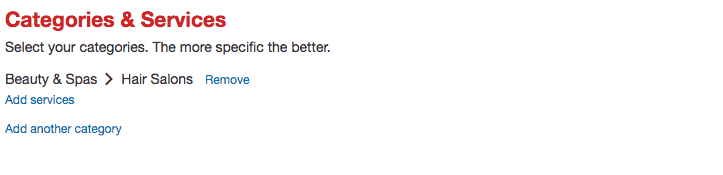
Yelp Business Services
Yelp recently launched a new Service Offerings section for business pages, which will allow you to tell customers the types of services available at a business. Not only does this better inform the consumer, but it also brings better queries to your attention.
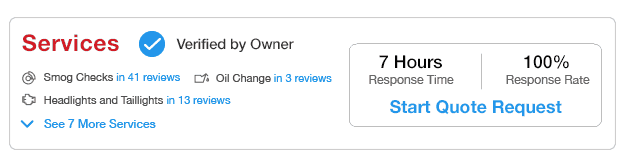
Service Offerings are tied to the Categories selected for the business, and it seems like you can add as many of these “sub-categories” as you want. The more specific you are in your provided services, the better.
- Go to the “Business Information” tab on the Yelp for Business Owners Page and find the “Categories and Services” section.
- You can add the business services by clicking on the “Add services” link underneath each of the business’ main categories.
How to Change Your Hours on Yelp Business
You can set your operating hours to any desired range, but Yelp says that it should correspond to the initial set of information reflected in a business’ website, menu, store window, or other physical locations.
- Go to the “Business Information” section on Yelp for Business Owners and click the “Edit” link next to the “Hours” section to make the appropriate time changes.
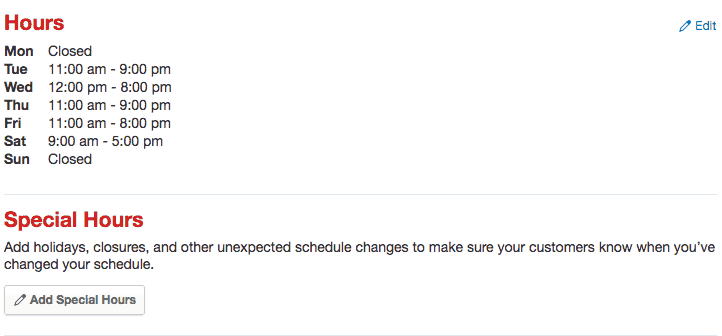
- You can also create a set of unique hours for holidays or special events by adding the specific dates and hours in the “Special Hours” section.
- Click the “Save Changes” button when you’re done.
History and Manager/Owner Descriptions
This section allows you to give more information to a Yelp user such as a business’ specialties, history, and background on the owner or manager.
These are free services for most businesses on Yelp, but those with nine or more locations will have to fork over money to add information on the business history and specialties.
These descriptions will immediately appear on the page, but Yelp moderators will review it to make sure it meets content guidelines. If they find that it doesn’t meet standards then the description is rejected and any changes made will revert.
- Edit the description in the “History” and “Meet the Owner/Manager” sections within the “Business Information” tab. You can click on the “Add” button in each section to create a new description. If you already have existing descriptions then you can click on the “Edit” link instead.
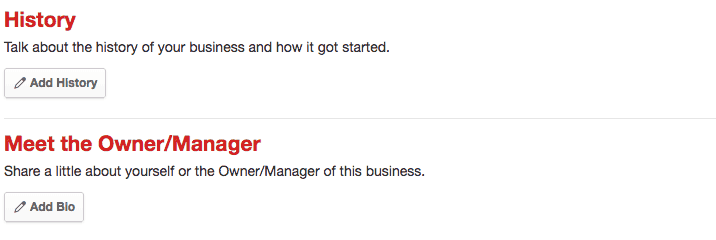
- When you’re done, click “Save Changes” to confirm your work.
How to Send Messages on Yelp Business
Those who claim their Yelp business page can automatically allow customers to contact them on the platform via the “Message the Business” or “Request a Quote” button on their listing. This starts a private conversation between you and that specific customer.
These buttons are automatically available for any claimed listing, but if you don’t respond to new messages in the past seven days and don’t respond to other messages in the past 30 days then Yelp will disable the button. You can reactivate it by responding to existing messages or by clicking on the “mark as replied” status on the message.
You can also toggle the feature on or off by going to your “Inbox” tab on the Yelp for Business Owners site.
- In the “Inbox” tab, click the gear icon on the top-left corner of the page.
- If you don’t have any messages in your Inbox you can press the link that says “Click here to enable messaging.”
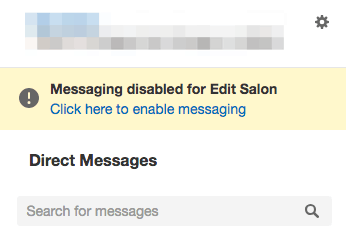
- If you don’t have any messages in your Inbox you can press the link that says “Click here to enable messaging.”
- Select the “Enabled” or “Disable” option from the dropdown menu.
- Click “Save” to finalize your changes.
NAP Information
Having the correct business name, address, and phone number (NAP) on a Yelp listing can provide long-term benefits, especially if the business has listings across multiple sites.
Correct NAP information makes it easier for potential customers to either contact you or find the exact location of the business and eliminates confusion with other establishments that might have the same name or be in the same area.
Consistency is key here, but so is meeting Yelp’s guidelines for each of the NAP elements.
Name: The entry should reflect how most customers would refer to the business. If the business is part of a larger franchise, you shouldn’t include its store number.
You should also avoid secondary and tertiary information that is already in other parts of the page such as categories, keywords, or the specific neighborhood.
For example, don’t say “McDonald’s Beverly Hills,” just say “McDonald’s.”
To add or change the business name on Yelp:
- Go to the “Business Information” section on Yelp for Business Owners and click the “Edit” link in the “Basic Information” section to make the appropriate name changes.
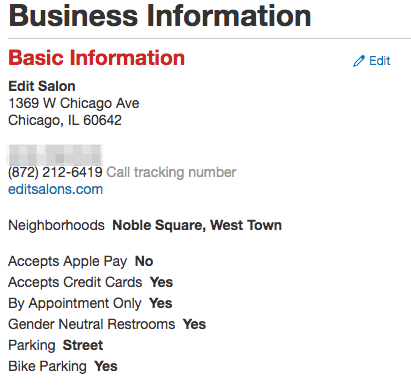
- Click the “Save Changes” button when you’re done.
Address: For most Yelp listings, a full address is required, which includes things like the building number, street name, city, state, and zip code.
Some businesses, such as local service providers, don’t need to put in their full address, but a zip code is still required. Yelp discourages the use of residential addresses for a business unless you want it exposed to the public. To add or change a phone number:
- Go to the “Business Information” section on Yelp for Business Owners and click the “Edit” link in the “Basic Information” section to make the appropriate address changes.
- Click the “Save Changes” button when you’re done.
Phone number: The number you put in this field should be a direct line to the business, and it should be easily reachable by anyone on your team. Extensions or numbers for national call centers aren’t allowed on a listing. Yelp might also reject cell phone numbers or tracking numbers. To add or change a phone number:
- Go to the “Business Information” section on Yelp for Business Owners and click the “Edit” link in the “Basic Information” section to add or make changes to the phone number.
- Click the “Save Changes” button when you’re done.
SEO Benefits
Having the correct NAP information above isn’t just for Yelp users. It also helps those looking for the business on search engines like Google.
Google prioritizes local businesses that have correct, consistent NAP information across business review sites and directories. If your NAP information is in good shape, you’ll rank higher.
There’s also a secondary benefit. Other directory sites will gather data from sites like Yelp. Correct information on Yelp will aggregate on other third-party sites and syndicate reviews, which further improves your SEO standing.
Of course, the opposite is true. Incorrect info from Yelp may get copied and posted elsewhere. So make sure your Yelp listing, as well as your local listing management strategy, is accurate.
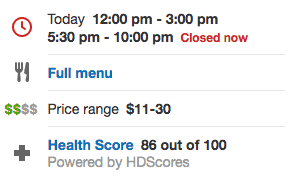
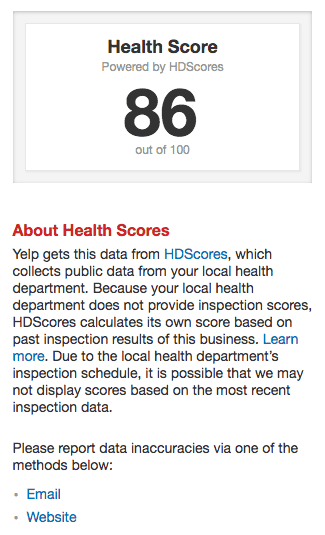
Yelp Health Score
As part of the ongoing effort to provide more information to customers, Yelp expanded its Health Score program in July 2018 across 42 states. This provides valuable information to customers in the form of health inspection reports, which is shown on a listing as a score out of 100 points.
Yelp gathers data from local governments as well as from a site called HDScores, which collects data from your local health department.
If your local government doesn’t have health inspection scores for a business, HDScores will create a score based on previous inspection data, which could lead to inaccurate health scores. In this case, you should contact your local health department or HDScores to remedy the issue.
- View the contact information by clicking on your listing’s Health Score.
- You should find an email or website link that provides contact information for you to update the current score.
-
- Yelp also noted that listings that have scores created by HDScores are calculated based on other restaurants in the area.
- Yelp also noted that listings that have scores created by HDScores are calculated based on other restaurants in the area.
Yelp Business Service Areas
Some businesses don’t have a fixed location because they constantly move around (food trucks are a great example). A Yelp listing is still available for these mobile businesses, but you’ll need to create a “Service Area” range to show where it will operate in a specific area.
The Service Area option is only available to businesses that have specific categories listed on their page. If a business with the Service Area feature also includes an address on the page, you can hide it to prevent customers from visiting that specific location.

You can add or edit a Service Area from the “Business Information” section of the Yelp for Business Owners website.
- Scroll down until you find the “Service Area” section in the “Basic Information” tab and click the “Yes” button underneath the question that asks, “Do you service customers at their location?”
- Type in the names of the cities where you provide service. You can include up to 6 major cities to your service, and each Service Area is limited to a 50-mile radius or a 100-mile diameter between the two further points in each area. Any area larger than Yelp’s limit needs to be displayed as a photo on your page’s Specialities section.
- Click “Save Changes” to confirm your selections.
Check-In Offer
You can learn how to build customer loyalty and incentivize more visits with Check-in Offers, which can appear every time a customer uses the Yelp app on their phone to check in to the business.
Each check-in by a Yelp user will also tell their friends on the platform about the business they visited. Keep in mind that Check-in Offers are only available to businesses that have specific categories on their pages. To set up the offers:
- Go to the “Business Information” section on Yelp for Business Owners. Find the “Check-in Offers” section and click the “Create a Check-in Offer” button.
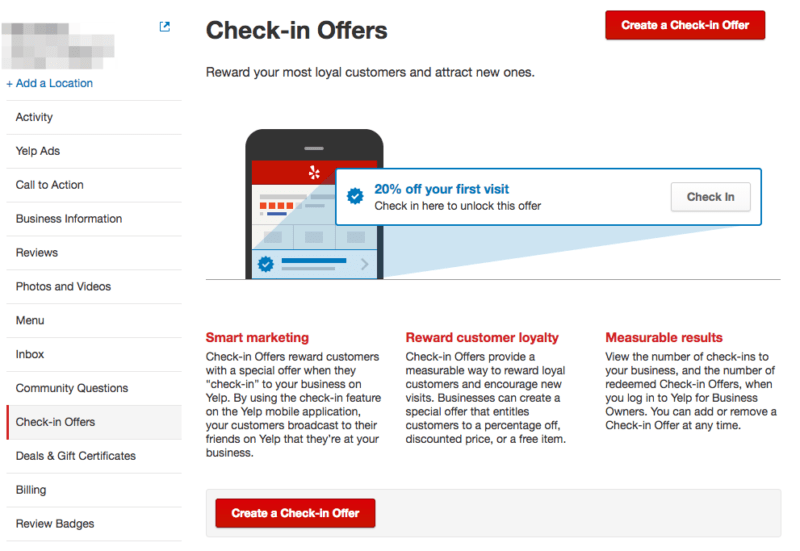
- Use the dropdown menu underneath the “Offer Type” title. You can choose to take a specific price or percent off an item or service, set a fixed price, or make it a free item.
- Fill in the offer title information in “Headline” text field. You can also to write additional details in the “Optional Details” section.
- You can also use this section to see a preview of the offer before it goes live. When you’re satisfied, click the “Create Offer” button to publish it.
-
- You can make additional changes or delete the offer altogether by clicking the “Edit” or “Remove” links next to the live offer on the “Check-in Offers” section.
Yelp Guest Manager
To help restaurant operations, Yelp recently announced and launched a comprehensive solution called Yelp Guest Manager. It incorporates popular integrations such as Olo (digital ordering) and Punchh (customer engagement). The software provides multiple solutions for restaurateurs such as:
- Reservations and waitlisting
- Table management
- Point of sales integration features
- Takeout order management
- Reservation seating conversion data
- Settings for self-serve reservations
- Curbside SMS support
- Kiosk support (available as an add-on)
Specifically, the Olo implementation allows for an automated process for new orders from the brand’s website or app and into the Yelp Guest Manager app. Yelp Business owners with Yelp Ads enabled can also add a pixel to the Olo portal to see the effectiveness of current ad campaigns through Olo.
Yelp’s Transaction Platform
The Yelp Transaction Platform allows users to utilize multiple services such as making reservations or ordering food directly from the Yelp app. These services include third-party platforms such as Yelp Nowait, Grubhub, Booksy, and Doctor.com. The full list of partners is available on Yelp’s support page.
![]()
If you’re already partnered with one of these platforms, then Yelp’s Transaction Platform feature should be automatically available on the business page. If you want to want to opt out of these features or add them to the page, then you’ll need to speak to the partner provider directly.
You can also check which partners have services on your page by acting as a customer and seeing where the service buttons lead outside of Yelp.
Yelp Reservations
Yelp also offers its own reservation system, appropriately called Yelp Reservations. The software can attract customers because it doesn’t charge additional fees for setup, web access, and even for each seat filled through Yelp Reservations. It even provides a free iPad for your incoming reservations. Yelp Reservations is a flat monthly fee of $249 per month.
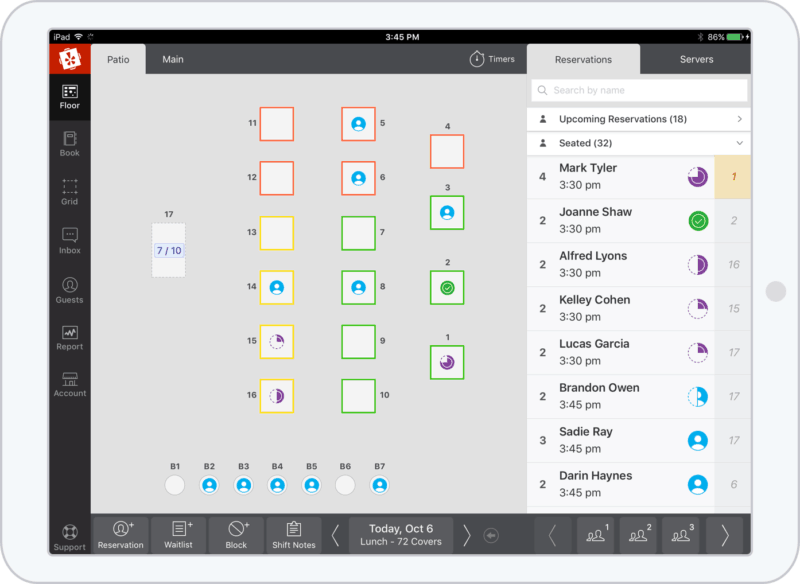
Most of your interactions with Yelp Reservations are through its dashboard with actions such as creating a top-down render of the business’ floor plan. Please note that this entire process is only available through Yelp’s website and not through the iPad app.
- Go to the “Configure” tab, which is on the main sidebar in the Yelp Reservations dashboard.
- Click on the “Rooms” tab at the top of the page. You can now click on either “Create New Room” or “Edit Room” to draw up a new floor plan or edit an existing template.
- Those creating a new room will now enter a name for the brand new template.
- A blank floor plan appears and you can drag and drop the desired number of tables onto the floor. You can also click on each table to rotate it, delete it, change its shape, or alter its overall capacity.
- With the right floor plan in place, you can click on the “Save New Room” or “Save” button to finalize it.
Before a room is available for reservations, you’ll need to add it to a sheet. You can create these sheets to show employees which tables or rooms are available during a shift. You will also need to schedule the sheet to allow reservations.
- Go to the “Configure” tab within the Yelp Reservations dashboard and click on the “Sheets” tab.
- Click on “Create New Sheet” and then enter the sheet’s name, the shift time, and the first and last seating times.
- You can also adjust additional advanced settings within a sheet if necessary. This includes:
- Pacing: you can restrict the number of online reservations to prevent an overflow.
- Turn Times: this is your prediction of how long each service should take based on the party size.
- Override Global CC Hold: activate this option to make it a requirement that a credit card is needed to hold the reservation under your specific conditions.
- Sheet Notes: these are additional notes to better inform customers during the booking process.
- Cutoff Time: this is a specified time set by you to determine when the sheet should stop taking online reservations.
- With the sheet details done, you’ll have to assign a room/floor plan to it by clicking the “Assign Room” button. You can assign multiple rooms on a single sheet, and dictate which tables are available for online booking, in-house reservations, or unavailable for any reservations.
- Click the “Save” button to confirm your changes.
Last but not least, you’ll need to schedule the sheet for specific sheets in order to start taking reservations. This will tell your staff about the specific tables and details available at different times of the day.
- Go to the Yelp Reservations dashboard and click on the “Configure” tab. Click on the “Schedule” tab on this section to take you to the dashboard’s Calendar.
- Select the dates for your sheets and click the “Add Sheet” (in some cases it will be “Edit Sheet,” “Replace Sheet”, or “Delete Sheet”) for the specific service time of the day: Breakfast, Brunch, Lunch, or Dinner.
- You can choose to only add a specific sheet for this one day or if it should repeat on the same day every week.
- Click the “Schedule” button to finalize your changes and repeat the process as needed for other specific dates or days of the week.
With your floor plans, sheets, and schedule out of the way you can finally open reservations through the Yelp Reservations dashboard.
- Click on the “Configure” tab in the sidebar and click on the “Reservations” tab at the top of the page.
- Toggle the “Accept Online Reservations” to “ON.”
- Activate other settings on an as-needed basis. A reservation widget should appear on the Yelp business page.
You can now toggle reservations on the iPad app by tapping on the “Book” or “Grid” tab, going to the “Options” icon on the bottom-right of the screen, and toggle the “Allow Online Reservations” status.
You can also integrate Yelp Reservations to your website or Facebook Page. This should make it easier for those who found out more about the business on non-Yelp platforms.
To set up a Yelp Reservations button for your website:
- Go to the Yelp Reservations dashboard and go to the “Configure” tab in the sidebar. Afterward, click the “Widget” tab at the top of the page.
- Multiple variants of the “Reserve Now” button are available to use. Click the one that appeals to you.
- You should now see HTML code for the button. Copy and paste it onto your website.
You can also add a Yelp Reservations calendar widget, which can also help customers find specific reservations dates.
- Go to the Yelp Reservations dashboard and go to the “Configure” tab in the sidebar. Afterwards, click the “Widget” tab at the top of the page.
- You should see a set of instructions for creating a custom widget.
- A custom HTML code should appear for your widget. You can copy and paste it onto your website. For WordPress users, you can follow the additional instructions to install the widget before copy and pasting it onto your site.
The Yelp Reservations button appears as a “Book Now” call to action button on a business’ Facebook Page, which you can also advertise to attract more potential customers.
- Click the “Add a Button” option below the cover photo.
- Go to the “Book our Services” section and select the “Book Now” options.
- Facebook will then ask for a URL address. You can find the reservation-specific address by going to the Yelp Reservations dashboard. Go to the “Configure” section on the sidebar and click the “Widget” tab at the top of the page.
- Copy the blue-colored URL on this page and paste it back onto the Facebook setup screen.
- Click “Add Button” to finalize the process.
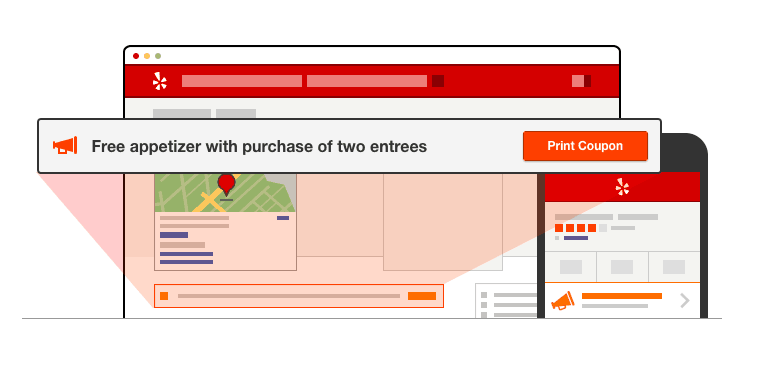
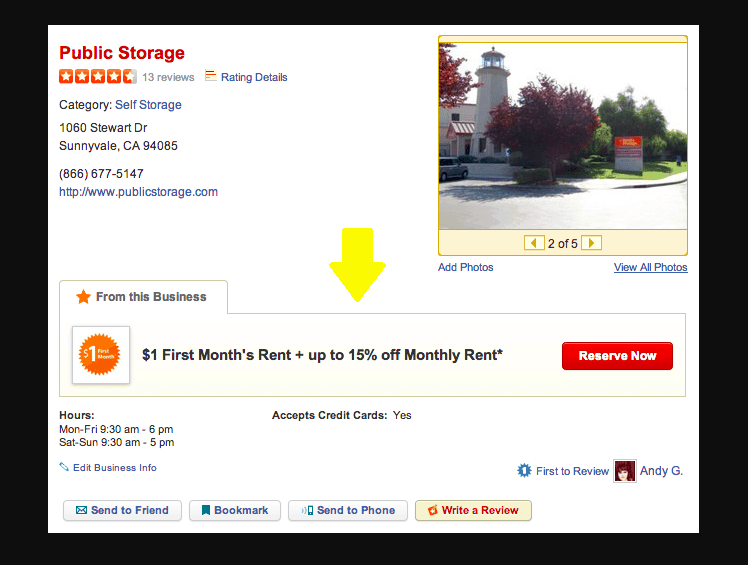
Yelp Call to Action
What is Yelp Call to Action? It’s a feature designed to help businesses on Yelp promote a desired transaction directly from their business page.
The desired transaction can be anything from scheduling an appointment, printing out a coupon, or buying tickets to an event. The offer appears on the listing, and is designed to attract people who are ready to make a spending decision.
As part of Yelp’s advertising program, Yelp Call to Action enables you to write free-form text and use an action button to help convert Yelp users into paying customers. It links consumers directly to an order form, coupon, or page on your own website.
Consumers can view and use your Call to Action button on both desktop and mobile devices, and you can have separate offers for desktop and mobile running at the same time.
According to Yelp, business pages with a Call to Action button deliver:
- An average increase of 33% more user views
- 38% more customer leads
Yelp is selling the Call to Action feature to businesses as a form of advertising. According to Entrepreneur, Yelp’s local business advertising packages typically cost between $300 and $1,000 per month. Each business can customize the products or services it wants to promote.
How to Add Yelp Call to Action
The Call to Action feature is included in some of Yelp’s advertising programs. To see if it’s currently available in your program, visit the Billing section of your Yelp for Business Owners account.
If it’s available and you’d like to enable it, contact your Customer Success Manager at Yelp. You’ll find their contact information in the Billing section, too.
How to Edit Yelp Call to Action
You can edit your Call to Action by going to the Call to Action section of your Yelp for Business Owners account. Click edit. Please note that any edits are subject to approval, which may take 2 to 3 business days.
Yelp Call to Action: Best Practices and Guidelines
Choose a unique Call to Action. Don’t pick an action that isn’t already possible on your Yelp page. If you already have a widget or link that enables Yelp users to book a table reservation or call your office, there’s no need to use Yelp Call to Action for those types of transactions.
Engage your visitors. Your Call to Action shouldn’t simply be a source of information or important announcements. While “Live Band Every Saturday” or “Happy Hour at 5 PM Daily” seems like very useful info, there wouldn’t be much reason for visitors to click your Call to Action. Give customers a good reason to click on the button, and deliver a good experience when they do.
Test it. Third-party links are not allowed in Yelp Call to Action. Links outside of Yelp should land on a page on your own website. Once you add a Call to Action, don’t forget to test it. Also, make sure that it’s mobile-optimized to best convert visitors into customers (and be sure to test it on mobile to make sure it works).
Measure your success. Make an effort to track (via your Yelp for Business Owners account) how many additional customer leads your Call to Action Button is generating. Then fine-tune your message to attract more customers.
Yelp Call to Action Example
One business known to make use of Yelp Call to Action is Ticketmaster, an American ticket sales and distribution company. Ticketmaster is implementing the feature on their Yelp listings by offering their page visitors (both on Yelp desktop and mobile) an instant way to purchase event tickets from the Ticketmaster page.
Yelp Call to Action is an exciting opportunity to promote your business on Yelp, where online reviews and ratings continue to make an impact on the behavior of consumers.
If you’re receiving more negative feedback than positive, Call to Action is at least a way to turn people’s frowns and rants into smiles and raves. If your Yelp listing is generating generally positive reviews and high ratings, the feature offers an additional way to maximize the potential impact of your Yelp business page and attract even more new customers.
Verify Your Business on Yelp
Like the CTAs, getting a verified badge on a Yelp business page requires participation in the Yelp Ads program. Specifically, it’s classified as a business upgrade to your advertising package. However, some businesses see it as a vital part of their online presence.
Becoming “Yelp Verified” means that the company’s moderating team checked “the business’ trade license and confirmed that it was in good standing.”
This type of verification can further cement a business’ standing in the eyes of consumers, which might lead to more exposure and customers. Users can also click on badge details to see further details about the license and the governing body that issued it.
- To sign up for the program you’ll need to give Yelp specific information including your trade license number and the issuing authority. Yelp says that only trade licenses qualify for the program, which means that traditional business licenses, tax documents, and other license formats won’t be accepted.
- Moderators will then check your information against the issuing authority’s information to confirm its validity and good standing. The same team will check multiple license databases to add the data for businesses that don’t immediately produce their license information during the initial sign-up phase. The process can take up to five days, but any information provided by the business can help expedite it.
- If all the information is correct you should get a notification of the approval and the badge will appear shortly on the page. In some instances, an application can be rejected. Some reasons include:
- A license wasn’t found.
- The license information found didn’t match the information on Yelp.
- The license provided doesn’t meet the Yelp Verified criteria.
- The license found is expired, revoked, or invalid in some other way.
Yelp Deals and Gift Certificates
You can further entice customers by offering deals and gift certificates for purchase directly from your Yelp page. These should obviously be available for any of the products or services offered in the business, but they should also be carefully worded so that they can’t be combined with other promotions or that specific products or services are exempt from the deal.
Deals and Gift Certificates are in their own section when you log in to the Yelp for Business Owners website.
- Click the “Set up Deals and Gift Certificates” button in the “Deals and Gift Certificates” section.
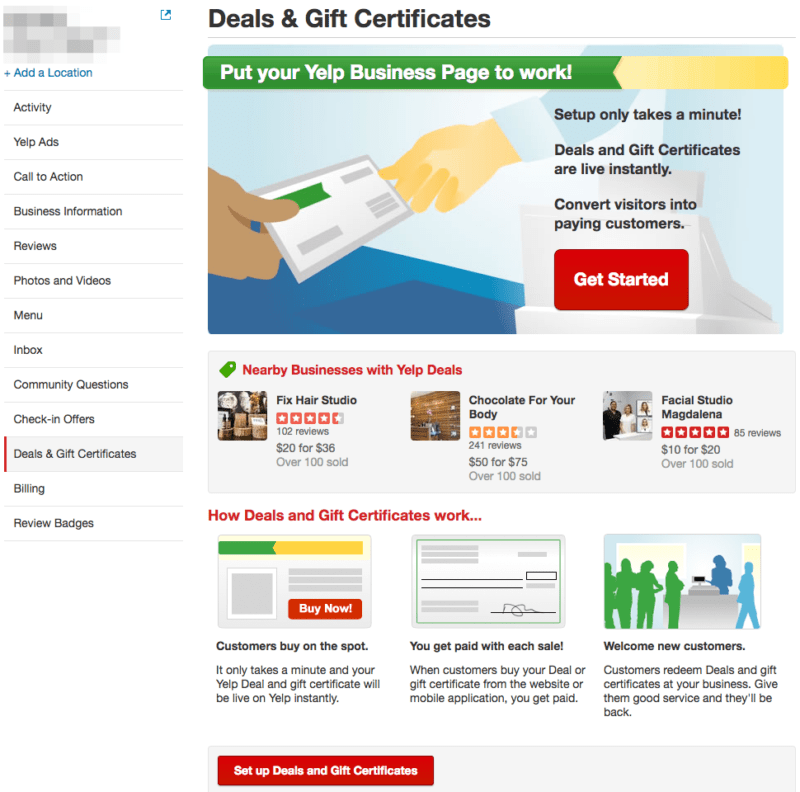
- You will then have to choose the number of vouchers for the deal, a set price, any special terms and conditions that go along with the deal.
- Prior to the deal’s publication, you’ll also need to agree to Yelp’s Merchant Terms.
- Click the “Post this Deal” button to publish the link.
When making a Deal offer, Yelp will also offer you the ability to make a Gift Certificate to accompany it. The setup is nearly identical to the Deal offers.
- Click the “Add Gift Certificates” button in the “Deals and Gift Certificates” section.
- You will then have to choose the price included in the certificate as well as the result of unused balances in the certificate.
- Review and agree to Yelp’s Merchant Terms, and then click the “Post this Deal” button to publish the link.
The photos that show up for your Deals are automatically generated by Yelp, which unfortunately means that you can’t change them.
You can see the list of customers who purchased a Deal by looking in the “Purchases” tab in the “Deals and Gift Certificates” section. You won’t see their contact information here, but if they write a review about the business you can respond to them in that section.
Those using the Yelp mobile app can automatically redeem their Deal by presenting it at the restaurant. All you need to do is confirm the terms of the Deal and then tap on the “Mark as Used” button on their app. If they bring in an email receipt or a print version of the Deal you can still mark it as used by typing in the Deal’s six-character code in the Yelp for Business Owners website.
- Go to the “Purchases” tab in the “Deals and Gift Certificates” section.
- Type the code into the “Claim code” text field.
- Click the “Redeem” button to confirm it.
Yelp will also accept refunds from customers that don’t want to use their Yelp Deal or are unsatisfied with their purchase. During this process, Yelp will first check to see if the Deal was redeemed.
Make sure that you immediately record a Deal as redeemed once it’s presented at the business to make sure that any refund request is accurate. If a customer has an issue with redeeming a Deal, you should tell them to contact Yelp’s Support team.
It should be noted that Yelp doesn’t automatically cancel a Deal if the customer violates its terms. However, you aren’t obligated to accept the Deal if they don’t follow the terms written in the deal. In this case, you should encourage them to contact the Yelp Support team for a refund.
Any profits you earned from Deals or Certificates are processed by Yelp on the fifteenth day of each month and then mailed to you. Yelp will send these payments to addresses listed in the “Payouts” tab within the “Deals and Gift Certificates” section on the Yelp for Business Owners site. To change or update this address:
- Go to the “Payouts” tab in the “Deals and Gift Certificates” section.
- You should see a button that says “Edit payout information.” Click that and update your address.
- Click the “Save” button to confirm the changes.
You can have payments manually sent to you more than once per month by clicking the “Request payment” button in the “Payouts” tab. Keep in mind that it may take up to 10 days for Yelp to process the payment in addition to the mail transit time, which can vary depending on the payment address. You can see a history of the payments sent to you in the “Payouts” tab.
If sales from your Deals and Gift Certificates exceed $599 for the year, Yelp will need to fill out additional tax forms before you receive payment. These forms will require you to submit a Social Security Number or Employer Identification Number. You can add this information through the “Billing” section of your Yelp for Business Owners website.
- In the “Billing” section click on the “Edit” or “Add Tax Information” buttons.’
- Add or update your Social Security Number or Employer Identification Number.
- Confirm your address and hit the “Save tax information” to finalize your changes.
Yelp’s Eat24 for Business
Yelp veterans might still associate Eat24 with Yelp, but that is no longer the case. In 2017, Yelp sold Eat24 to Grubhub for $287.5 million. Now Grubhub is removing the Eat24 brand completely with most of the accounts on Eat24 transferring to the main Grubhub brand.
Yelp’s main relationship with Grubhub in terms of food deliveries through its Transaction Platform seems to be unaffected by this change.
Yelp Business Reviews
Arguably, the main attraction for Yelp is user reviews. Yelp says that over 171 million reviews exist on the platform, which makes it one of the top five business review sites according to online reviews statistics.
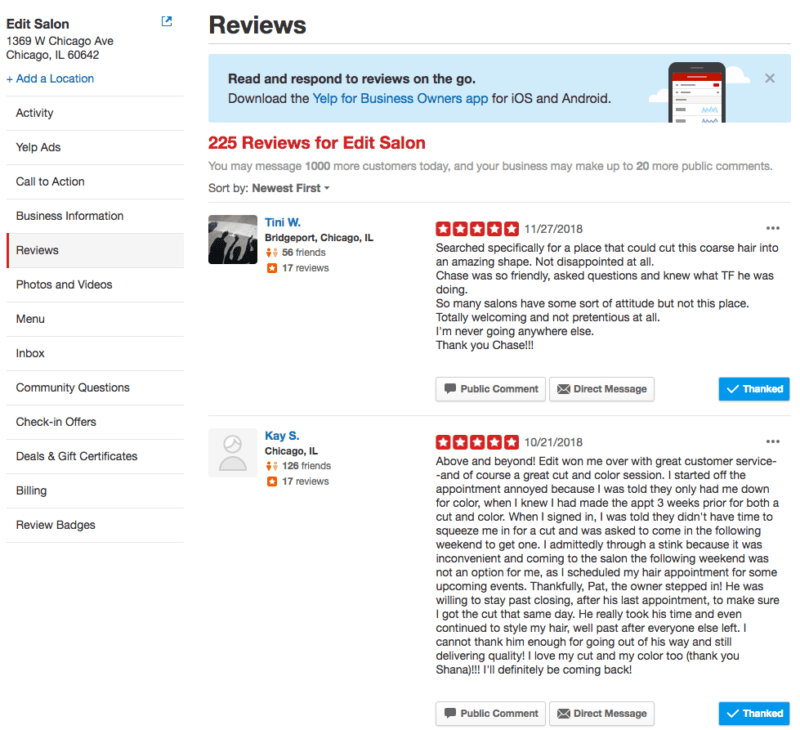
The overwhelming number of reviews means that you need to stay on top of every review and respond appropriately to positive and negative feedback. You can make this process easier with powerful reputation management software.
Get Reviews to Show Up
Some Yelp page owners might notice a few Yelp reviews disappearing or removed completely. There are a few reasons why this is happening:
The author deleted the review: The user might choose to remove their review entirely, and unfortunately, you (as the page manager) won’t be able to recover it in any way. The only to get it back is if the user writers another review of the business.
It violated Yelp’s content guidelines: Reviews that include threats, promotional content, or violate another person’s privacy won’t make it to a business’ reviews page. Other criteria include:
-
- No hate speech.
- No conflicts of interest. This means your mother can’t leave a great review of the business.
- The review should have relevance to the business.
- It must be original content.
Yelp’s review system sees it as a “Not Recommended” review: We’ll go into more detail on this later on, but Yelp’s automated system will display specific reviews higher than others based on numerous factors such as the user’s overall activity on Yelp and the quality of the review itself.
A review that doesn’t meet these criteria is deemed as “Not Recommended.” It still appears via a link on the bottom of the Yelp business page. In addition, the review’s score rating also doesn’t factor into the business’ overall rating.
Responding to Reviews
Reviews are racking up on a page, but doesn’t mean that you can just ignore it. You’ll need to respond in some way to make it engaging to the user.
Online review statistics data shows that 80% of consumers believe that a business cares more about them when it responds to reviews, but only 63% said that a business actually respond to a review. Responding not only shows engagement, but a willingness to address the issues brought up by the reviewer.
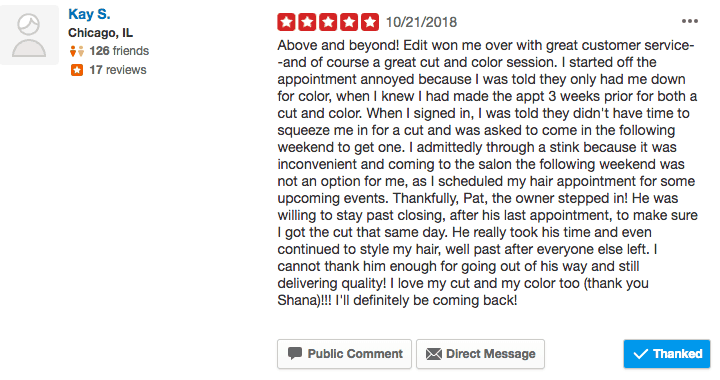
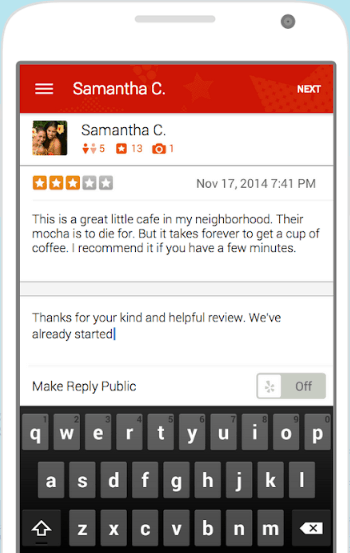
Positive Responses: Even the highest praises require a response. You can simply press the “Thank” button below the review to send Yelp’s pre-built response. This is sent as a direct message to the user.
However, it’s important to show some unique emotion for a more natural response. You can also send the reviewer a direct message or publicly comment on the review.
To create a public comment:
- Find the review within the “Reviews” section of your Yelp business account.
- Click the “Public Comment” option next to the review. You can press the “Preview” button to see what your comments before it’s published.

- Click the “Post Comment” button when you’re ready.
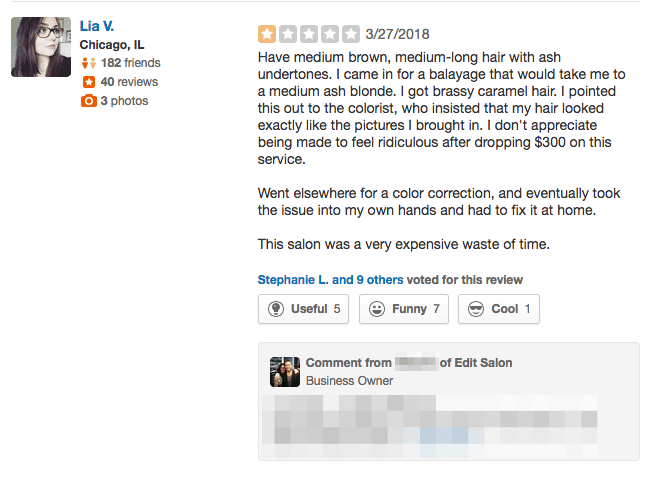
Negative Responses: When learning how to respond to negative reviews, the important thing here is stay civil. Thank the person for the review, and try to solve their problem if it’s within reason. If necessary, try and steer the reviewer to discuss the issues with you in private.
- Find the review within the “Reviews” section of your Yelp business account.
- Click the “Send Message” option next to the review and write your response in the text field.
- Hit “Send” when you’re finished.
Negative reviews are inevitable, but the way you handle it can say plenty about the business. An online review statistic revealed that 45% of consumers are more likely to visit a business that responds to negative reviews.
Yelp Business Response Rate and Time
Yelp users can also see a business’ response rate and time, which can determine if it’s worth their time to send a message with questions about the business.
Response rate is calculated by the percentage of the new messages that you responded to over the last 30 days. Response time is also calculated over the previous 30 days, and it’s the result of the median time you took to respond to any message over that time period (this excludes messages that just arrived).
What you should aim for is a high response rate and low response time to show that you frequently monitor the page and respond with useful information.
To respond from the Yelp for Business Owners website:
- Go to the “Inbox” section and click on the user’s message.
- Write your response in the text field. You can also click on the camera icon to add up to five images to your response.
- Click “Send” to respond to the user.
You can also respond directly to a user from the email address attached to the Yelp business account. When responding, your email address won’t appear, and the response will look similar to the responses crafted from the Yelp for Business Owners portal.
Keep in mind that you can only respond through your email address once in the conversation. If the user continues the conversation after your response you’ll have to continue the thread on the Yelp for Business Owners site.
How to Get More Yelp Reviews
The general rule of thumb when you want to get Yelp reviews is not to ask for them. Yelp’s review recommendation software relies on unbiased reviews from its users. They have to be genuinely impressed or displeased with the experience to create a real review.
If Yelp discovers a listing with solicited reviews then it will put a search ranking penalty that will drastically affect a business’ exposure on Yelp. Any “extreme attempts” to raise a business search ranking or reputation might even lead to a Consumer Alert on the reviews section of the page. The alert will disappear after 90 days if Yelp doesn’t see any additional faults from the listing in question.
How to Get a Find Us on Yelp Sticker
While you’re not allowed to ask people to leave a review, Yelp does allow you to post Yelp Stickers stickers on your locations’ windows to remind people you have a listing on Yelp. Yelp even provides you with these stickers for free.
These stickers are a helpful way to remind people to visit your Yelp listing and leave a review.
To learn how to request one, read our guide to a Yelp sticker and how to get one.
“Recommended” and “Not Recommended” Reviews
By default, Yelp sorts reviews based on its recommendation software. It factors in three main attributes: review quality, overall reliability, and user activity. This means that active Yelp users who provide a wide range of reviews have a higher chance of having a “Recommended” review, although Yelp says that 72% of all reviews on the site are “Recommended.”
Yelp’s recommendation software refreshes on a daily basis, so you’ll see a different set of “Recommended” reviews every day.
According to Yelp, reviews that don’t belong in the recommended category are classified as Yelp fake reviews. This includes reviews coming in from the same computer or show apparent bias. A review also won’t be “Recommended” if it comes from a user that Yelp doesn’t “know” well enough yet.
In addition, Yelp also won’t factor in reviews that seem to be a long rant against the business. Yelp believes these reviews aren’t an accurate representation of the customer experience.
You can still find them by clicking on a link at the bottom of a Yelp listing page, but the scores provided by these reviews won’t count towards a business’ overall score.
The Yelp recommendation software affects all listings equally, which means those that advertise on Yelp don’t have an unfair advantage against other businesses that don’t have promotions. In addition, those managing Yelp business pages have no control over the review software.
Yelp’s “Review Highlights”
Above the long list of reviews on a Yelp page is the “Review Highlights” section. This features reviews that “reflect overall trends” that Yelp sees in multiple phrases and words across a majority of a business’ reviews. Yelp added this feature for those who want to see the overall sentiment towards a business without having to comb through a multitude of reviews.
“Review Highlights” isn’t available by default for every Yelp listing. The business needs to be classified under an eligible category in order to get access to it (restaurants are a great example). In addition, the page needs to feature plenty of reviews. Yelp didn’t provide a specific threshold of reviews, so it’s best if you continue to gather as many reviews as possible.
Yelp Review Badges
One way to showcase a business’ reputation on a non-Yelp website is with Review Badges. These are tiny widgets that you can add to a website to promote the Yelp listing. You can find them in the “Review Badges” section when you log in on the Yelp for Business Owners website.
- Choose from one of the four options available. Some badges feature the business overall star rating and the total number of reviews (this will update in real time) while others have a minimalist design that just shows the Yelp logo.
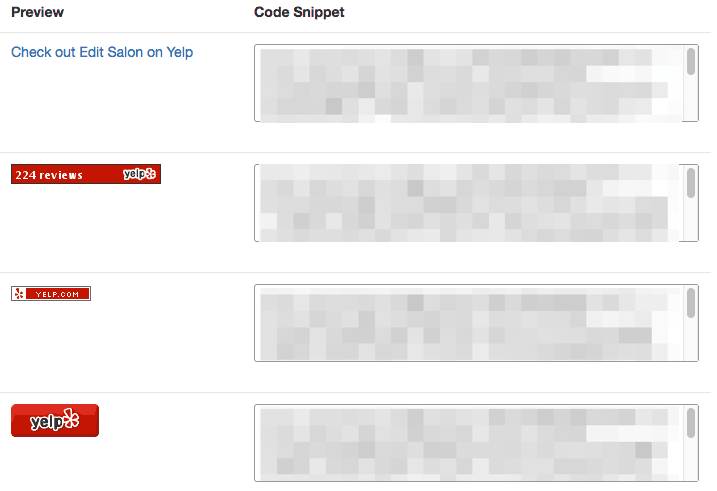
- Copy the HTML code next to the badge of your choice and paste it on your website. The badge should appear after you confirm the code alterations.
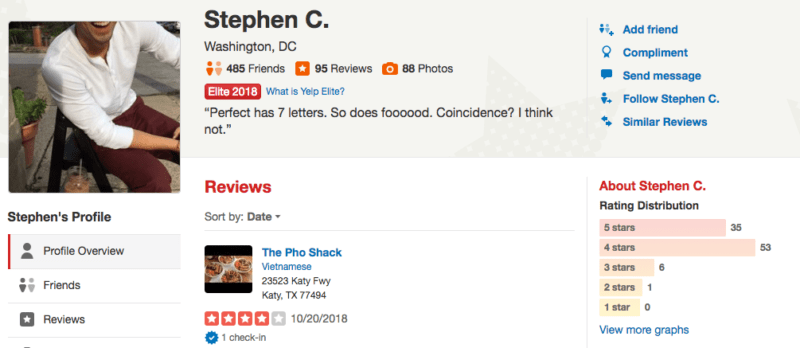
The Yelp Elite
Diehard Yelp users can nominate themselves when applying to the Yelp Elite Squad. These are Yelp’s power users who do more than just write reviews. They continue to be engaging, provide helpful tip, and also vote on other reviews.
Users can start the process by filling out nomination form on the Yelp Elite Squad page, but be warned that there are some criteria that you need to meet to be considered for Elite status.
- You must use your real name on the profile.
- Your profile must feature a real photo of yourself.
- You must be of the legal drinking age in your country.
Membership only lasts for a year, so you will need to re-apply via local Yelp community manager near the end of the calendar year to stay in the group.
Business owners and those managing a Yelp business account now or in the future are not allowed to join the Yelp Elite Squad.
In addition to the small Elite Squad designation on the user profile, Yelp Elite users also get access to exclusive Yelp Elite Events.
Yelp Business Review Widget
Yelp doesn’t have an official widget for third-party websites. Instead, it has the review badges, which we previously explained in this guide. However, Yelp does have a feature that allows you to embed specific reviews from the business page onto a website.
The quality of an embedded review is better in multiple ways compared to your average screenshot. The review will also feature up-to-date information about your Yelp page, specifically the business’ overall rating and the number of reviews submitted.
- Find the review you want to embed on the Yelp page, and hover over the area underneath the reviewer’s info. A series of options should appear.
- Click the “Embed review” link. A smaller window will pop-up that features embed code.
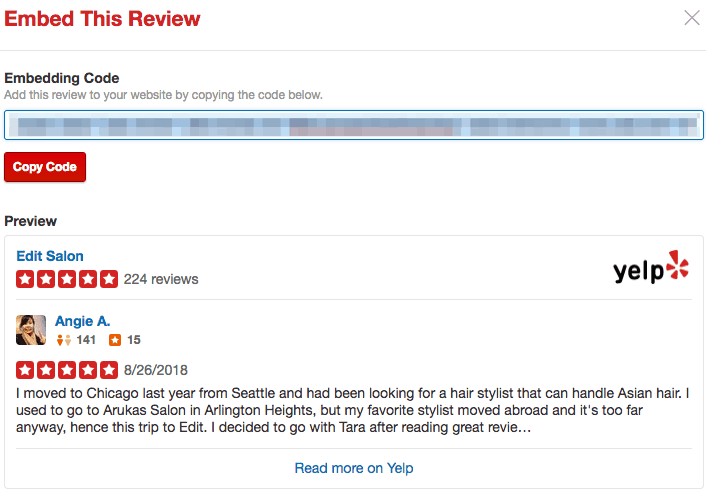
- Click the “Copy Code” button to grab the code and paste it onto your website.
Keep in mind that the “Embed review” link is only available through the consumer-facing version of the Yelp page.
Review Search
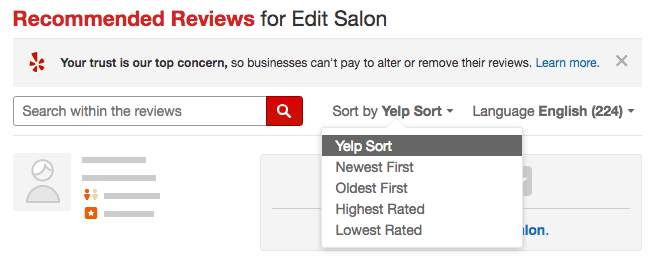
There are a few review sorting options available for Yelp users, but they can also search for specific reviews based on a few choice keywords.
It’s unclear how Yelp sorts these reviews, but our observations seem to indicate that the internal algorithm utilizes multiple factors such as overall rating, if the review received votes, and when the review was posted. Being a Yelp Elite Squad member doesn’t seem to help in any way because the first page includes reviews from both regular and Elite users.
However, Yelp does talk about how it chooses the review that pops up when someone does a general search for something like “shoes” or “tacos.” Yelp says the highlighted review is decided by an algorithm that uses factors including its overall relevance to the keyword and whether or not the review is recommended.
Can You Delete a Yelp Review?
As a Yelp business page manager you can’t delete reviews posted on the page. That feature is reserved for Yelp users, and they can only delete their own reviews one at a time. Specifically, they will need to delete the most recent post first before deleting older reviews.
If you’ve resolved a customer’s problem and they want to delete a non-longer-relevant negative review, you can direct them to do so as follows:
- Yelp users should go to the “Reviews” section of their account to find the review they want to remove.
- Click the “Remove Review” button, which is represented by the trash can icon.
- Hit the “Confirm” button to finalize the changes.
However, deleting a review should be your absolute last resort when convincing a customer to change their review after you help solve their issue. Instead you can ask them to either edit their review or add an update to it.
Manage Your Yelp Accounts
Claiming, adding content, and tracking and learning how to get Yelp reviews are the main things you need to do with your business account, but there are other features and actions available within a business account that are worth your time.
Merge a Business and Personal Account on Yelp
Unfortunately, you can’t merge your personal Yelp account with a business account. Furthermore, you can’t use your personal account to manage a Yelp business page.
Those who made a personal account for the purpose of claiming a business page will need to close their personal account and use the Yelp for Business Owners page to create a business account and claim a page.
However, Yelp does allow a “non-promotional personal account” for business owners. You can use this account to use Yelp like a regular user, but you shouldn’t use it to promote the business.
Merge Pages on Yelp
There doesn’t seem to be a method for combining two pages, but you can report duplicate listings to Yelp to make your page the definitive listing for a business.
There are some business, like food trucks, that are the exception to the duplicate listings rule. However, you can accurately show information for these mobile businesses by displaying its service area on its Yelp page.
- Find the duplicate listing on Yelp and click the “Edit” button next to its name.
- Another window should pop up. Scroll to the bottom of that page and check the box labeled “This is a duplicate of another business on Yelp.”
- Those without a general user account will need to write in their email address, a link to the duplicate listing, and any additional information.
- Click “Submit Changes” when you’re done.
Edit Page Names
The steps to editing a business’ name on Yelp make the process look easy, but Yelp will need to verify the change to make it official. You can expedite verification by making the name change obvious on public-facing channels such as social media account or the business’ main website.
- Log in to the Yelp for Business Owners page and click the “Edit” link on the “Business Information” section.
- Type in the new name of the business under the “Business Name” text field.

- Scroll to the bottom of the page and click “Save Changes” when you’re done.
Yelp also advises that the name should be simple to read. This means that the name shouldn’t include an address, license, or specific store ID.
Share / Transfer Access for a Yelp Business Account
Yelp business page managers can share page access to up to 15 additional users who will all get the same permissions and actions. These users must also make their own Yelp business account to get access.
Those managing a business that has 10 or fewer locations can invite new users from their Yelp for Business Owners account. Businesses with more than 10 locations might need to submit a formal request to Yelp’s support team to add more users.
- Go to the “Account Settings” tab in the Yelp for Business Owners site and click on the “User Management” section on the left-hand menu.
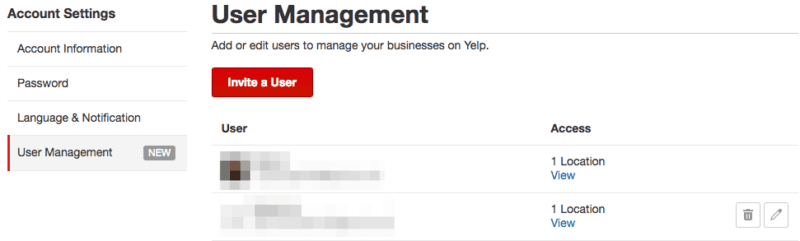
- Click on “Invite a User” and choose one of the job title options for that user.
- Type in the new user’s email address and select the location pages that are a part of their access.
- Click “Send Invite” to formally invite them as a page manager for the listing.
You can also edit or remove a shared user’s permissions for any reason. In addition, you’ll get email notifications for any modifications to your access. Contact Yelp’s Support team if you think an access change was made in error.
- Go to the “Account Settings” tab in the Yelp for Business Owners site and click on the “User Management” section on the left-hand menu.
- To remove a user, click on the trash can icon and confirm their removal. Otherwise, click on the pencil icon to edit their access by choosing to add or remove them from specific pages.
Business page managers might also transfer their account to someone else because another person might take care of the page or the business is under new ownership. In both cases, you’ll need to meet the criteria set below:
- Make sure you claimed the page and that you have a Yelp for Business Owners account.
- Provide the email address associated with the business account.
- Understand that once the change is made you’ll lose any access to the business account.
Once you have necessary information and understand the changes to your access you’ll need to contact Yelp’s Support team to start the transfer process.
Set Up Email Notifications
Notifications about the Yelp business page are delivered to the email address associated with your business account. These email notifications include:
- When someone reviews the business.
- When customers send a message.
- When someone posts a question about the business.
- Billing confirmation
- Additional information of the listing’s performance on Yelp.
- When displayed information about the business is changed.
- Additional Yelp products and services for business owners.
- When a Yelp advertising specialist sends an email.
- When someone purchases a Deal or Gift Certificate.
- Ad performances
However, you can choose which notifications will appear in your inbox by going to your business account settings:
- Go the “Language & Notifications” section in your account settings.
- Check or uncheck the boxes next to the notifications that you want to receive or ignore, respectively.
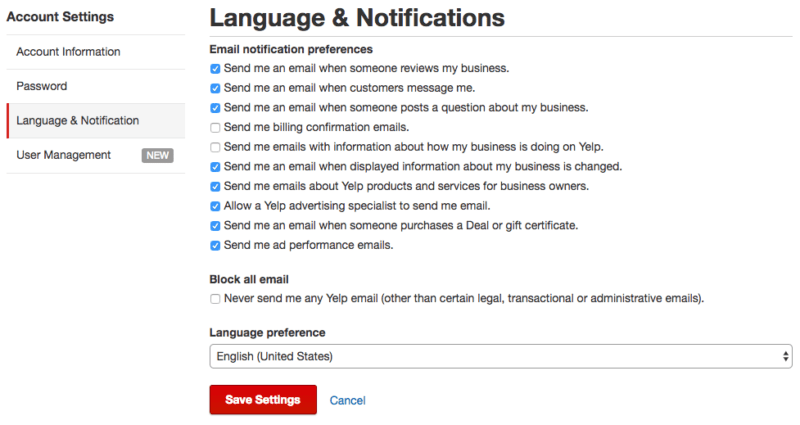
- Choose an email language from the following dropdown menu then click “Save Settings” to confirm the change.
Yelp Information on Apple Maps
Yelp has a partnership with Apple where it provides “some of our business page information.” However, the way that the information is integrated into Apple Maps seems to be under Apple’s discretion.
If your listing on Apple Maps is incorrect or outdated, you’ll need to contact Apple to have it changed. You can do this by tapping on the “Report a Problem” button within the Apple Maps app.
Speaking of Apple Maps, you can check out our quick guide to add your business to Apple Maps.
Yelp for Business Owners App
Those constantly on the go can still manage their business listing through the Yelp for Business Owners app. With the app you can gather information about engagement and leads, respond to reviews, and monitor the page in real-time.
You can find the app on the App Store or Google Play. You can also get a direct link sent to your phone by typing in your number on Yelp’s support page.
Yelp Business Advertising
You can put some money behind your Yelp business listings by creating advertisements. The Yelp Ads program puts a business front and center during a search so that it gets more exposure with each visitor.
Yelp Ads includes multiple tools to help you create, monitor, and analyze the ads for your business page. Some of the features we previously mentioned – such as the Calls to Action buttons, Deals, and Gift Certificates – are all part of the Yelp Ads program.
How to Use Yelp Advertising
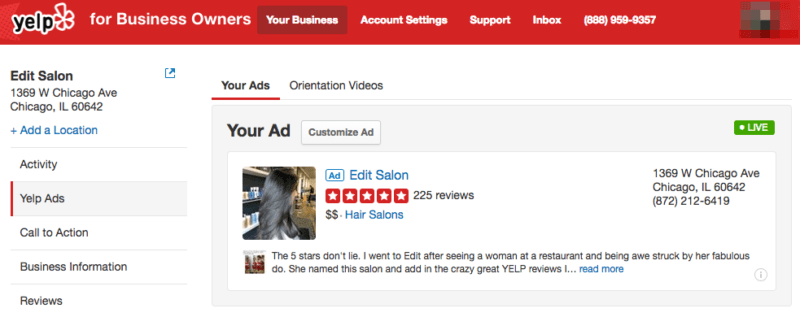
Your Yelp advertising tools are conveniently located in the “Yelp Ads” section of your Yelp for Business Owners page. From here you can create targeted ads and opt-in to an upgraded business page.
These features are primarily used by local businesses that have between 1-10 locations. Yelp also offers another ad services for businesses with more than 10 locations. This provides the same services but includes additional support from the Yelp Support team.
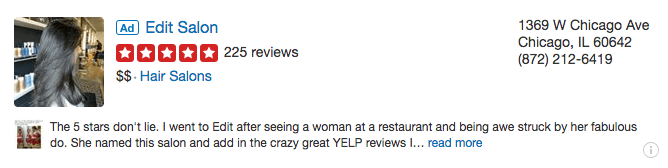
Targeted Ads: These are snippets of your business page that appear in search results, competitor pages, and the Yelp mobile website and app. It includes valuable information for the user including the business name, address, and phone number as well as its overall rating, a photo, and customer review.
You can start the process by clicking on the “Get Started” button within your Yelp Ads section.
- You’ll see a preview of your ad based on the page’s information. You can also write a brief description of the business’ specialties, which will appear on the ad if you don’t have enough reviews on your page. Click the “Continue” button on the bottom of the page when you’re satisfied.
- Set your ad budget. Yelp provides three suggestions based on the business’ categories which shows the average daily budget and estimated clicks per month. You can also choose to set your own daily budget. Keep in mind that you’re only charged when someone clicks on the ad.
- Opt-in to the Enhanced Profile upgrade. You decide whether or not to check this box to upgrade the business’ page. This upgrade will allow you to add a Call to Action button, customize the order of the photos on the page, and most importantly, remove the competitor ads that might appear on your page. The cost to upgrade is measured on a daily basis. Click “Continue” below the upgrade when you’re ready to move to the final step.
- Finalize your ad order. You’ll see the grand total of your ad options, and you can edit your choices if necessary. Fill in your billing information and agree to the Yelp Ads and Upgrades terms before clicking the “Purchase” button.
Customized Ads: Yelp recently added “Distance Targeting” and “Custom Ad Text,” which can help you create a more effective ad. The former feature allows you to change the geographic radius of your ad for local searchers while the latter lets you choose the picture and review (or your own custom text) that will appear in the targeted ad.
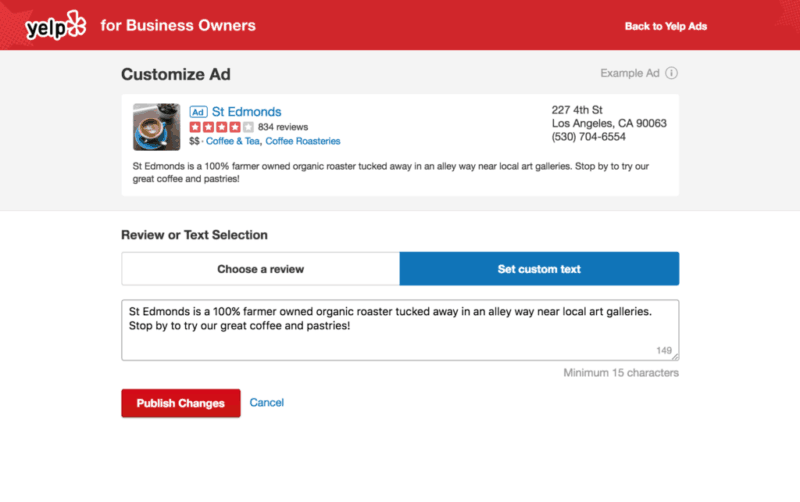
You can change these options by going to the “Yelp Ads” section and clicking on the “Customize Ad” button above your ad.
Measuring Ad Performance
With an ad up and running, you can check in on its performance in the “Yelp Ads” section of your Yelp for Business Owners page.
A bar below your current ad shows your current budget allocation for the month. You’ll see how many clicks you gathered so far as well as average cost spent per click.
You’ll also a larger picture of the ad’s performance in the “Historical Metrics” chart. You can see data on overall clicks and impressions over the last last 30 days, the current month, the previous month, the last 12 months, or for the current year.
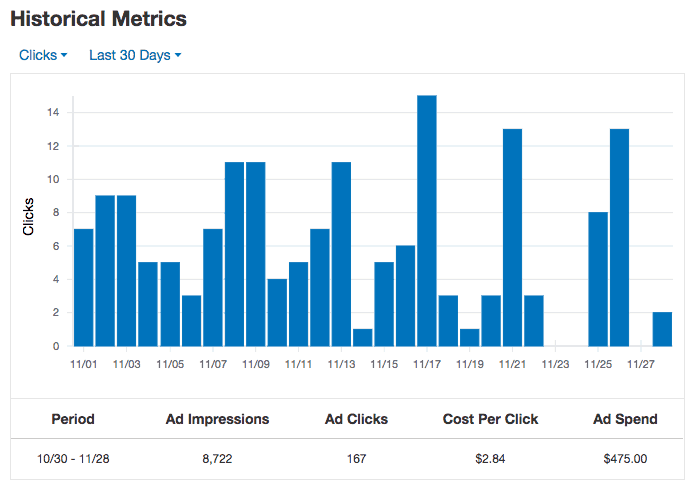
A table below the graph provides extra insights into the data. You’ll see ad impressions, clicks, the cost per click, and overall ad spend over the time range you selected for the “Historical Metrics” graph.