
Google My Business (GMB) is an essential marketing tool for any brand. Through GMB, you can update your business information on Google; appear on Google Maps; allow customers to make reservations, get directions to, or directly call your locations; and engage with existing and potential customers through their Google reviews.
But just how important is Google My Business? Consider this customer reviews stat:
Approximately 63% of consumers check reviews on Google before visiting a business.
In other words, more than 60% of the people searching for businesses on Google are ready to become customers. To make sure you get these consumers through your doors, we wrote this guide. With it, you can master GMB, make full use of its features, and attract the most customers. Scroll through each section, or use the table of contents below to navigate:
-
- Set Up Your Google My Business
- Google My Business Login
- Claim Your Business on Google
- Google My Business Categories
- For Business Locations with Multiple Categories And Departments
- Verify Business on Google
- Bulk Locations on Google My Business
- Add Descriptions to Google Business
- Google My Business Photos And Videos
- Adding Services and Menus on Google My Business
- Managing Google My Business
- Add or Change Your Hours on Google My Business
- Add Holiday Hours on Google My Business
- Google My Business Posts
- Add the Google My Business Bookings Feature
- Generate Leads Using Google My Business
- Turn On Messaging and Chat with Customers
- Questions and Answers
- Fix Incorrect Business Information on Google
- View Insights on Google My Business
- Managing Reviews On Google
- For Agencies: Setting Up Google My Business
- Do More With Google My Business
- Set Up Your Google My Business
Set Up Your Google My Business
Adding your business locations to Google My Business is more complicated than just entering your name, address, and phone number. You’ll often need to claim a pre-existing listing, verify your information, and choose the correct attributes for your listing. To do so, follow these steps.
Google My Business Login
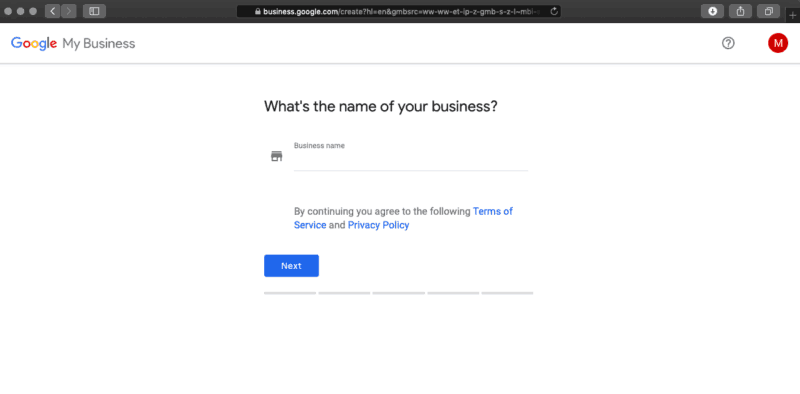
- Visit https://business.google.com/ to sign in or create a Google account for a business.
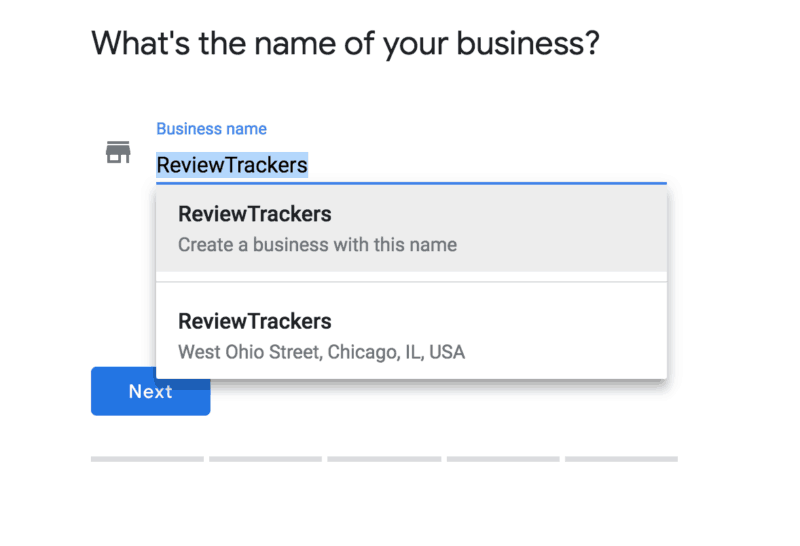
- Once logged in, Google will ask, “What’s the name of your business?” You can search for a listing by typing the business name and address in the search box. Results will appear in a list as well as on the map. (Below, we’ll talk more about claiming and verifying your business location in bulk.)
Claim Your Business on Google
- To claim your business on Google, click on “Add location” on the “Manage Locations” page.
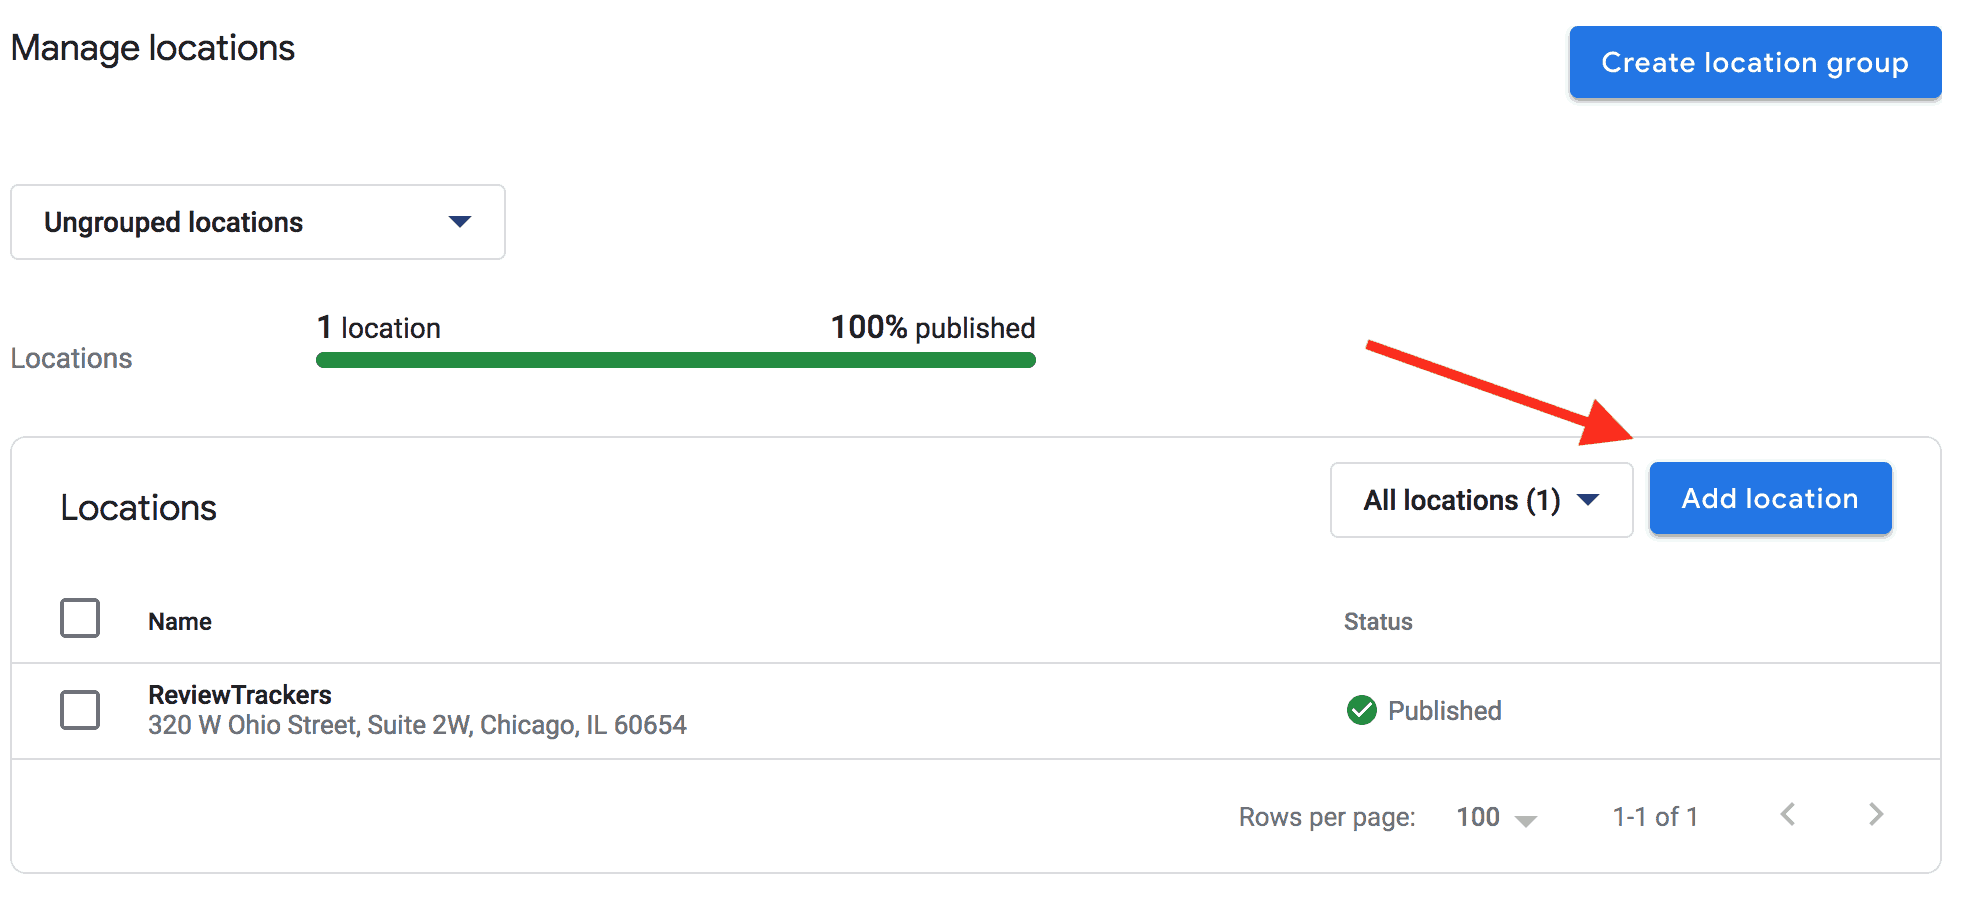
- Google will ask you for the name of your business. Type its name on the search bar and click on the correct name if it appears on the dropdown list.
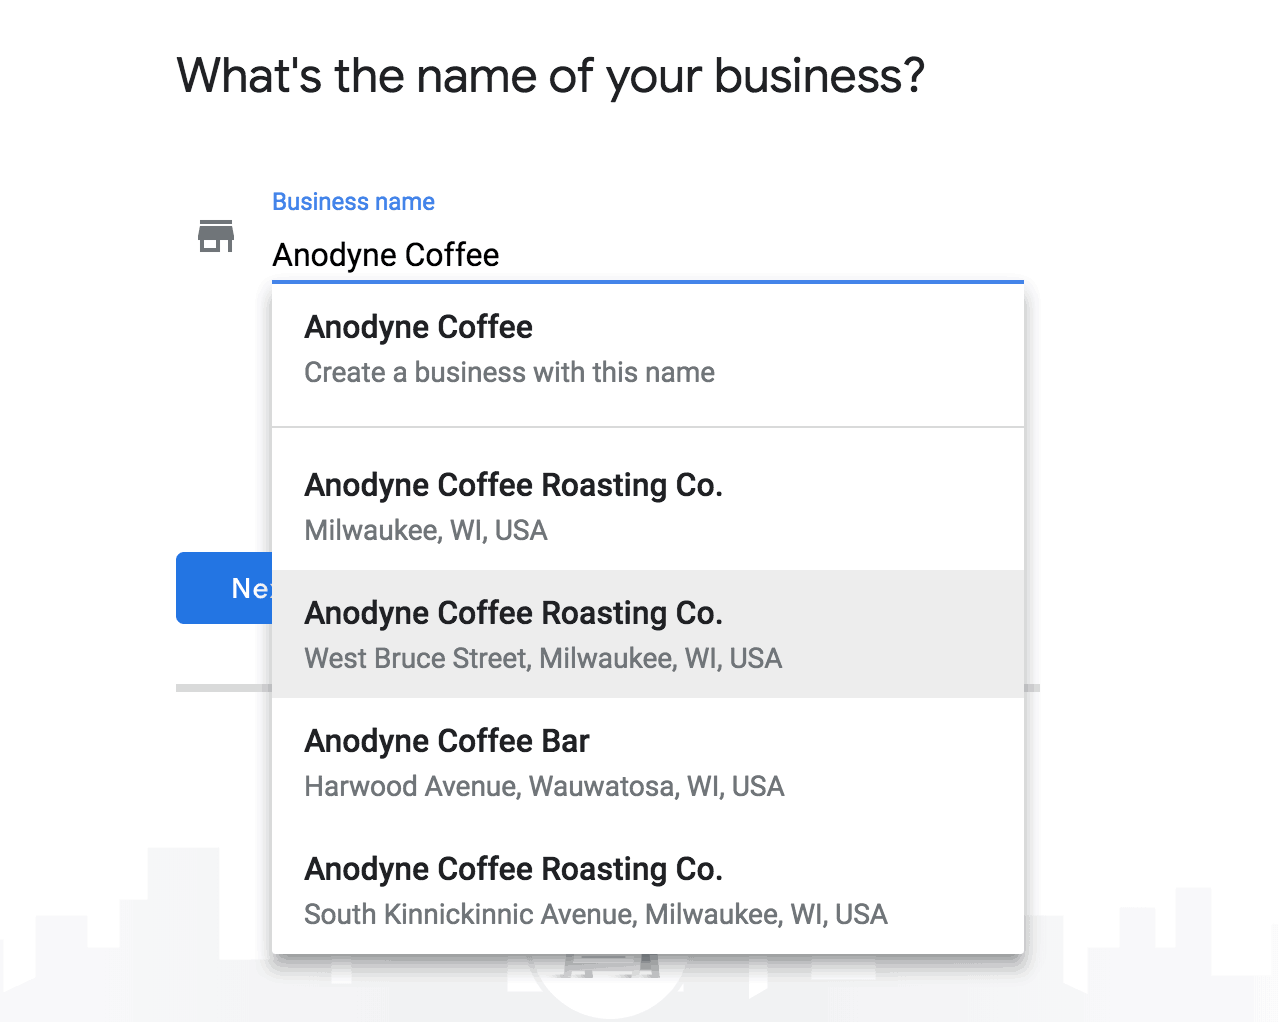
- If none of the results match your business, click the top of the list where it says “Create a business with this name.” You will then choose the business type: storefront (restaurants, hotels, etc.), service area (taxi service, delivery, etc.), or brand (products, brands, causes, etc.).
 One note about service-area businesses: Google released a new update to Google My Business in January 2019 that makes it easier for service area businesses to sign up for a listing.
During the sign-up process, Google will ask if your business has an office or store. Choosing the “no” option will allow you to choose your service areas before moving on to selecting your brand’s category.
Businesses with both storefront and service area locations will also be able to edit information for each location separately, which should make it easier to customers to find the right location.
Google My Business Categories
If you’re creating or adding your business to Google using Google My Business, you can choose from a list of categories to provide more accurate information about your business. For example, if you run Taco Bell’s marketing, you can (perhaps optimistically) put your business in the “Mexican Restaurant” category. Categories are very specific. You can drill down into sub-genres like Tex-Mex or be as broad as possible by simply listing “Fast Food Restaurant.” 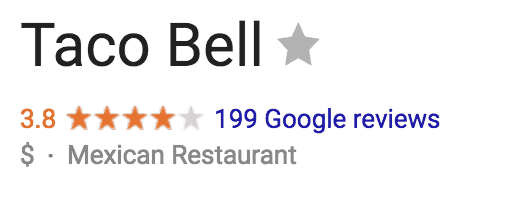 If you manage a brand, Google recommends that all your categories be consistent across all your locations. So every Taco Bell is categorized as a “Mexican Restaurant” and every McDonald’s is a “Fast Food Restaurant.” Once you’ve created your listings you can always go back and edit your GMB categories. Click into that location (or location group) then click on “info” on the left menu. Once you see the details for that listing click the pencil to edit, delete or add Google My Business categories.
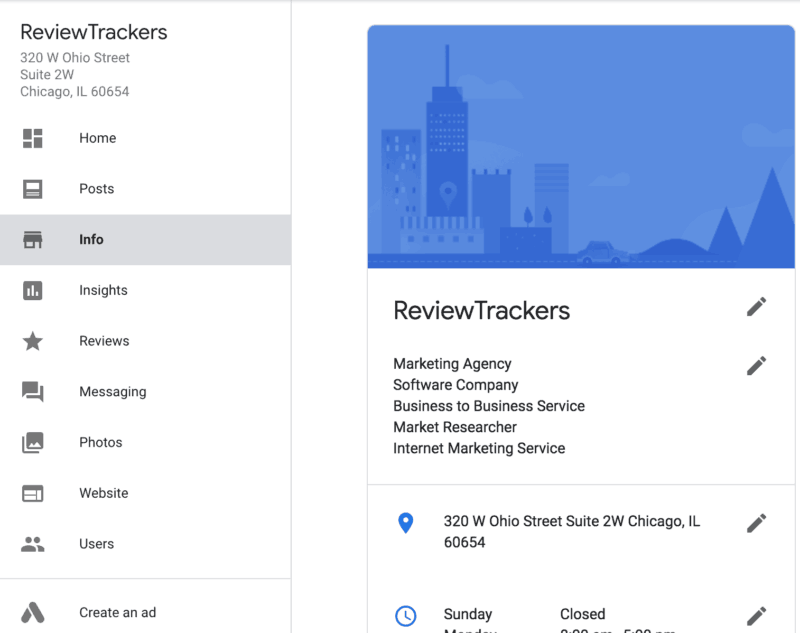
For Business Locations with Multiple Categories and Departments
For organizations with multiple locations Google only allows you to have one primary category for each location. However, there are some slight exceptions. For example, if you manage marketing for a chain of grocery stores, you can list your grocery stores and the pharmacy inside them as two separate listings, each with its own primary categories. Check out this example from Costco: 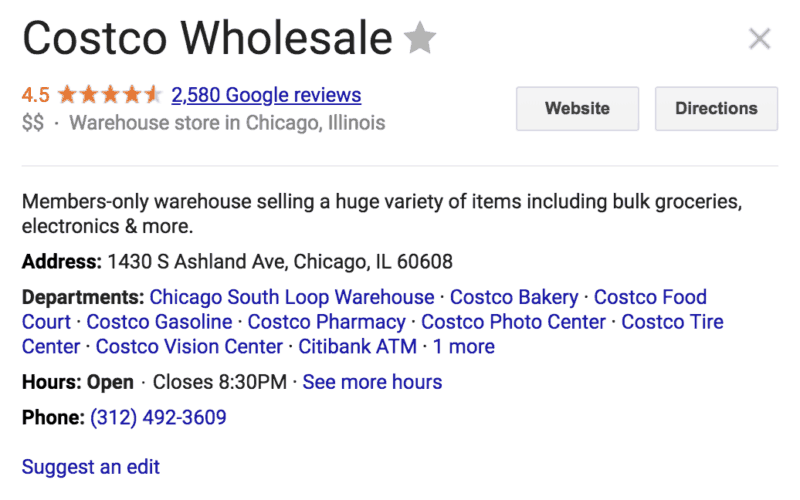
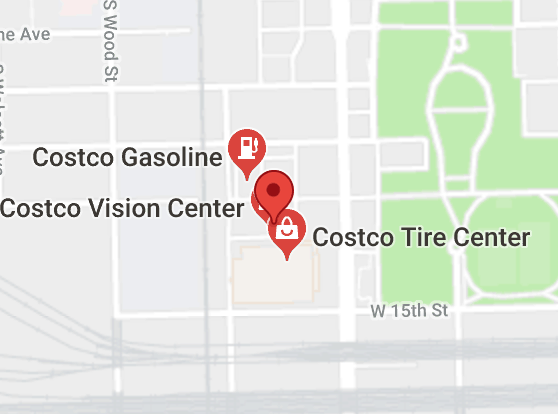 Costco takes this approach to the extreme — listing its gas station, bakery, food court, tire center, and a number of other departments all separately. For businesses like this that have one main location, but two distinct operations that are different enough to warrant multiple categories you may be able to add them as separate locations. What qualifies for a multi-department listing? Think about banks inside grocery stores. Or restaurants inside gas stations. Google’s guidelines say that if your departments have separate entrances and / or separate customer care, you may qualify for multiple listings.
If your businesses have two (or more) distinct operations running at one location, look to see if you can list both under separate categories. This will allow you to show up in more relevant search results.
Verify Business on Google
The next step is using the Google Verify My Business feature. You’ll have to verify to Google that you own or represent the business listing. Typically, the verification code will be mailed to you (yes, snail mail) – this takes one to two weeks. Once you’ve entered the code into your account, you’ll finally be able to start managing your local business information on Google. You can verify a business on GMB in other ways — email, phone, and Google Search Console — but these are usually not available. If you do see a phone icon and an option to verify by phone, Google recommends you choose that over a postcard because it is so much faster.
Option 1: Verify My Business By Mail.
The most common way to get a business verified is through the mail. Google will send you a postcard with a verification code attached to it.
- In your GMB account, click on the “Verify Now” option after clicking on a business listing.
- At the postcard request screen, check and make sure that the listed address is correct. (You can also request a postcard through the GMB app by tapping the “Send postcard” button).
- Wait patiently. The postcard takes about two weeks to arrive, and it’s important not to change any information during this time. Doing so will only delay the verification process.
- Once you have the code, you can go into the GMB account, click on the business location you want to verify and hit the “Verify location” button in the menu or the “Verify now” option.
- Enter the five-digit code and hit submit to finish the process.
Option 2: Verify My Business By Email
- Sign into GMB, and choose a specific location.
- Click on the “Verify” button and select email as a verification method.
- You should see a message in your inbox that contains a code. You can enter that code in the GMB dashboard.
- Click the “Verify” button in the email message.
Option 3: Verify My Business By Phone
- Verifying by phone can be available if you click on your phone number after hitting the “Verify” button.
- A call will come through your phone and you will need to listen for the automated voice system. The system will then give you a code, which you will have to enter in the code field. On the app, all you have to is tap the “Call me now” option and enter the code from the automated voice system.
Option 4: Verify My Business Instantly
- Those already using Google Search Console for a business may qualify for instant verification. Just make sure that the email used for the GMB account is the same as the one used to verify the listing on Search Console.
- Please note that all businesses on Search Console might not be eligible for instant verification. In this case, the best option is to get a code via mail.
Bulk Locations on Google My Business
If you are managing a number of business locations (10 or more), you don’t have to add them one by one on GMB. Instead, you can use the Google My Business Bulk Location Management tool. Just visit the Google My Business Locations page to upload locations from a spreadsheet (here’s a free template of the spreadsheet you’ll need to use), and edit the information associated with each location. (Note: Currently, you’ll have to use this function from GMB’s classic mode because it’s not yet available in the new version). 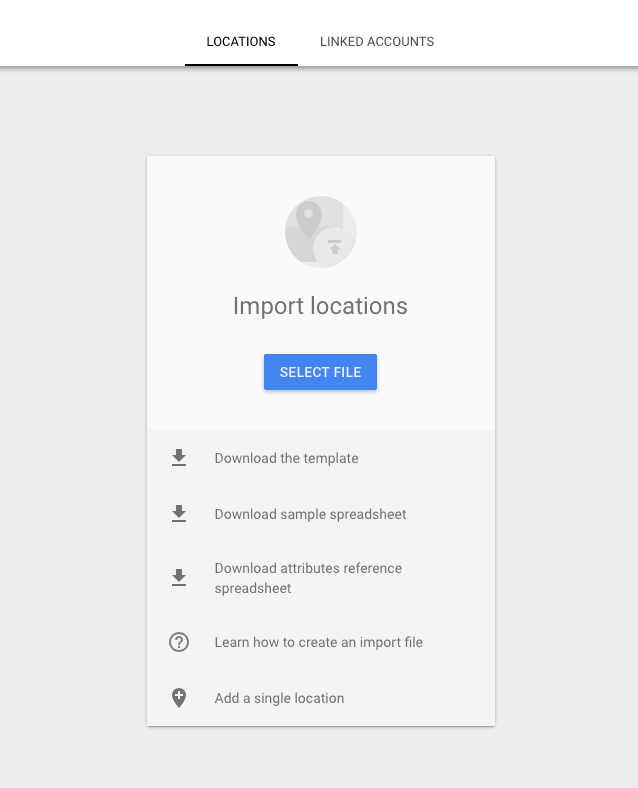 You need to make sure all locations meet the following quality standards:
- The business must make in-person contact with customers during its stated hours.
- The business must be open to the public.
- You may not enter locations that are under construction or not yet opened.
- You must be the owner of the business or an authorized marketing representative.
- Your listing name must match your real name, as represented by your offline marketing material, such as signage, etc.
- All locations must have the same name unless the business’s real-world representation consistently varies from location to location.
- All locations must also have the same category if they provide the same service.
While you can use your regular Gmail account to get this process started, we highly recommend that you create a new account using an email that reflects the domain of the businesses to be uploaded. Using the business domain will reduce the time and steps required to complete the Google verification process.
For bulk uploads, use this free template.
Add Descriptions to Google Business
Your Google business description is a summary — up to 750 characters — that appears when a user searches for your local business or checks out your listing on Google, via a desktop computer or mobile device.
It’s usually displayed alongside or underneath your online reviews and ratings on Google, as well as your business’ review snippets. (Review snippets are algorithmically selected quotes from Google users and local guides that provide information on the keywords most mentioned by your reviewers.) Here’s how business descriptions might appear on desktop computers and mobile devices: 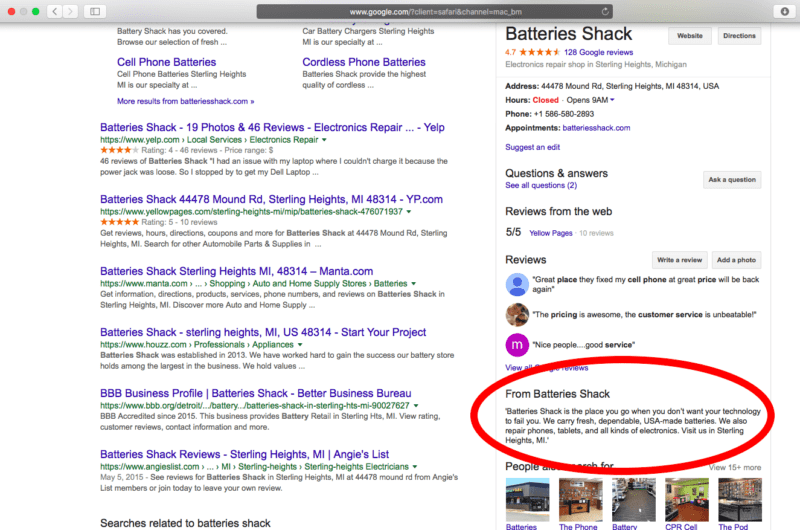 To get started with adding your Google My Business descriptions, sign in to your account.
- On your Homepage, look for an option to “Add description.” Alternatively, you can click on your Info tab on the right and look for the section where you can add your business description.
- Add your business description then click Apply.
Here are some more guidelines set by Google for when you’re writing out your business description:
- Don’t spam it. Use it as a way to pitch your business. Focus primarily on details about your business instead of details about promotions, prices, or sales.
- You should be upfront and honest about the information provided, focusing on content that is relevant and useful to your customers to understand your business. Do not include URL links or HTML code, or exceed 750 characters in the description field.
- Avoid misspellings, gimmicky character use, gibberish, etc.
Google Business Photos and Videos
Your Google My Business photos and videos are deciding factors when it comes to attracting customers. These images are the first impression of your business. They can attract customers or drive them away.
Add Photos and Videos to Google My Business
Once a business is verified, you can start adding photos through your account on your desktop or GMB mobile app. In both cases, you’ll go to the menu and select the Photos section.  From there, you can upload any photo or video you want so long as it meets the following size and format restrictions. Click on the blue “+” button to start adding your media:
Google My Business Photo Size and Format
- Images can either be in a JPG or PNG file format and at least have the dimensions of 720 x 720 pixels.
- The overall image file size should be between 10 KB and 5 MB.
- Images must also be focused and show a well-lit area. You are not allowed to use image filters or perform “significant alterations” to the photo.
- In addition to general photos of the business, you can also designate two images as the cover and profile photos. Profile photos are a distinctive way for customers to recognize the business on Google while a cover photo shows off “your page’s personality.”
Add Video to Google My Business
You can add videos so long as they are less than the 100 MB file size limit. They must be no longer than 30 seconds and use a minimum resolution of 720p. To do so, you’ll stay in the “Photos” section of your listen. Above your current photos, you’ll see an option for “Video”  You’ll use the same process to add video as you did to add photos. Click the blue “+” button and upload.
Remove or Delete Photos from Google My Business
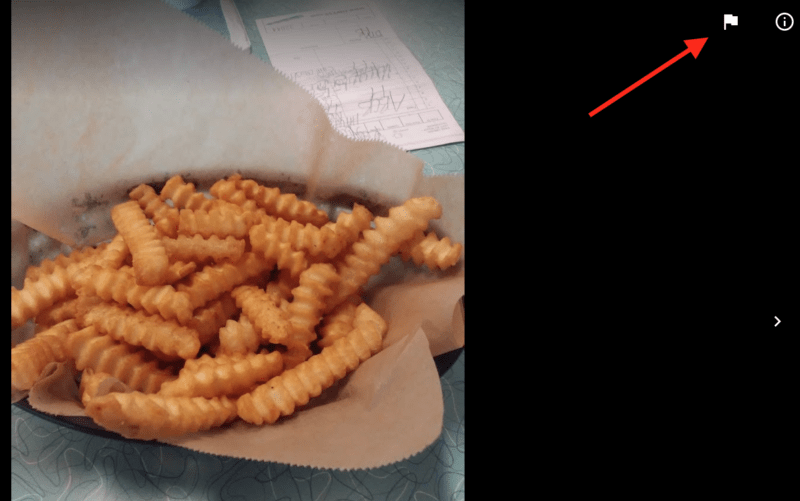
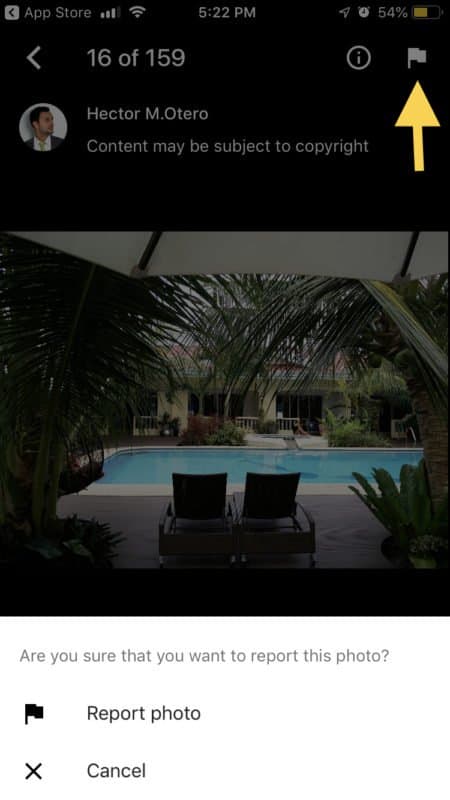
Owners and managers aren’t the only ones who can add photos to their locations. Customers can do it as well. However, there might be some images that don’t meet Google’s Format Specific Criteria. In this case, you can flag them so that Google can review and possibly delete the images.
- Within your GMB account go to the Photos section and select the offending images. To bring them to Google’s attention click on the flag icon on the top-right corner of the page.
- Mobile users can also select images in the GMB app’s Photo section, but they will need to go to the menu and click on the “Report photo” button.
You can also flag images via Google Maps. Once you find the business and the photo you want to flag, click on the three-dot menu icon on the top-left corner of your screen and click the “Report a Problem” button. You might also see a flag icon on the top-right corner of the screen, which you can use to report the image. 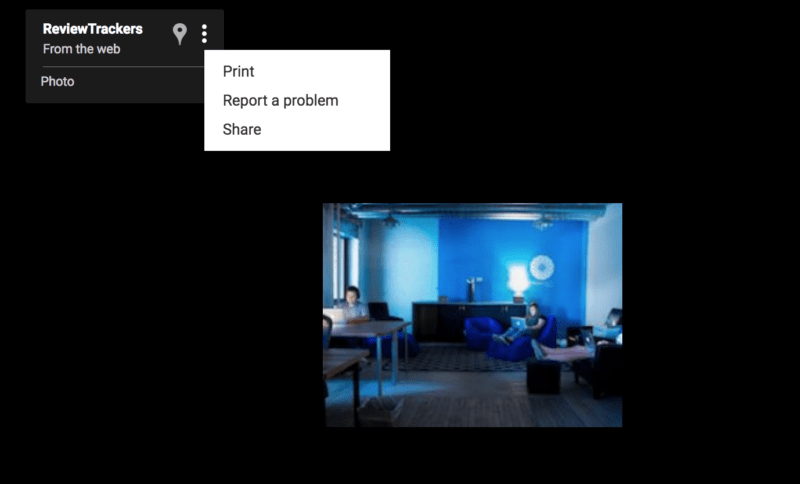
Adding Services and Menus on Google My Business
Using Google My Business, restaurants and service-based businesses can submit additional information and links in order to help consumers learn more about their locations. The process is a little different for restaurants and service businesses, so let’s start with restaurant menus. There is a Menu editor available on GMB for businesses in the restaurant industry. To access it, click “Info.” 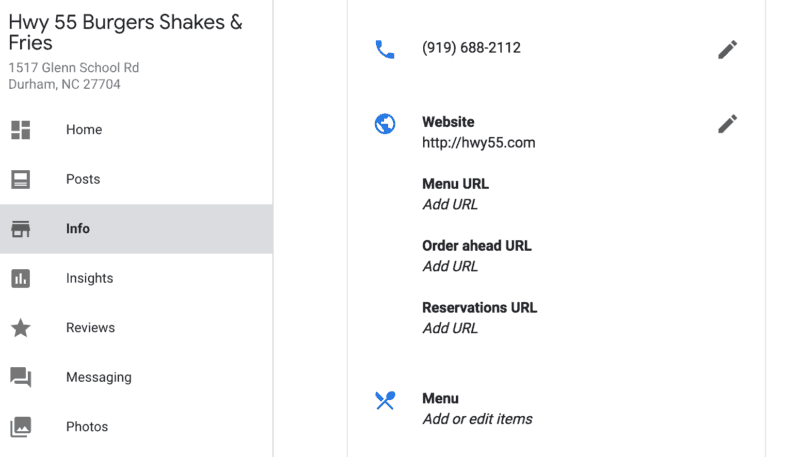 You’ll see two places that mention a “menu.” You can either add a menu URL (that links back to a menu listing) or you can add menu items to your listing one by one. Restaurants can use the editor to add menu items (dishes), including title, description, and price, as well as to create multiple sections of the menu, i.e. appetizers, entrees, and desserts.
 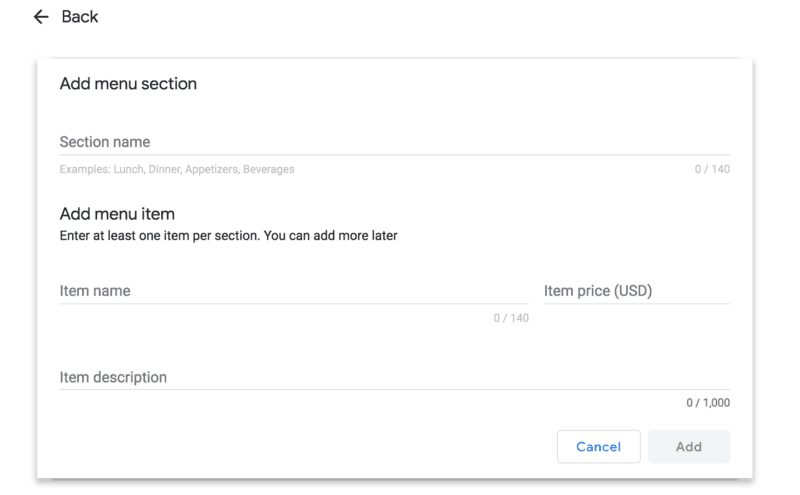 This feature is only available if the listing is not currently connected to a third-party provider and for listings in English-speaking locales. If you run a service company, your experience will be similar. Click the “Info” section of the GMB listing for that location, scroll down, and you’ll see a place to add Services to your listing (and potentially an appointment URL if you have online booking).
 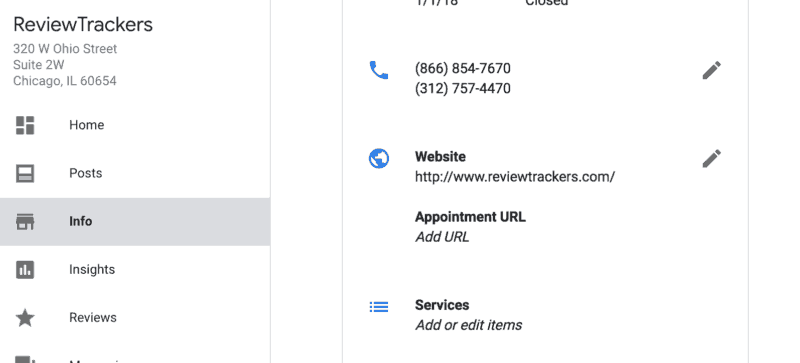 If you click to add Services to your listing, you’ll be prompted to add a service item, description, and price:
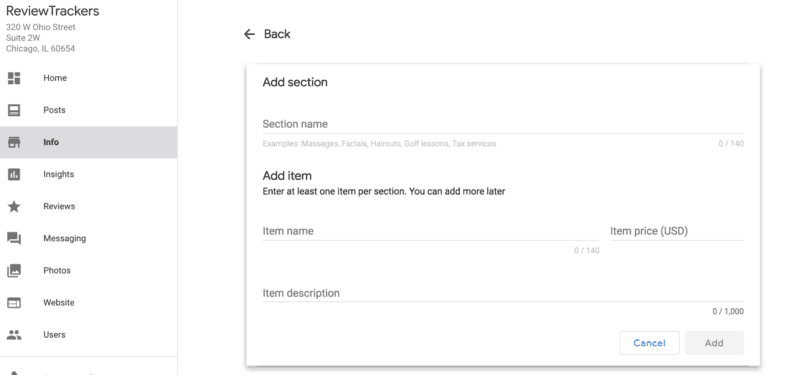
How Come the Menu and Services Information and Links Appear Automatically?
Links to certain booking and ordering services can appear automatically with your business listings in Google Search and Google Maps. These links are updated automatically via third-party providers. There’s no way to add, edit, or remove these links in Google My Business. Google works with select third-party providers that provide booking and ordering services for local businesses.
Links for third-party providers display as a result of a relationship your business previously established with them. These links lead to the website of the third-party provider. From the third-party website, a user can take an action such as ‘place an order’ or ‘make an appointment or reservation.’
If you want to remove or fix a link in your own listing, please contact the third-party provider’s support team or a technical contact to request they remove your data from the information they are sending Google.
Managing Google My Business
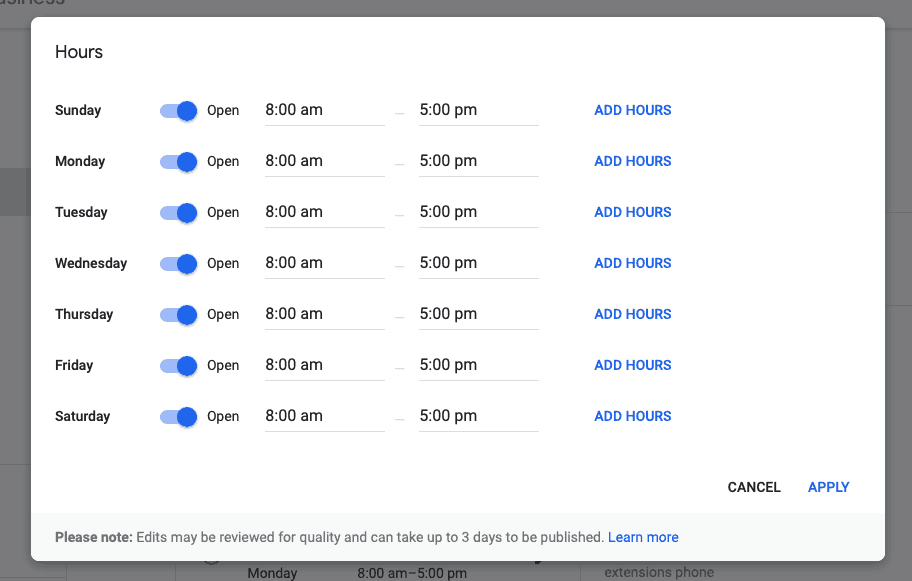
Add or Change Your Hours on Google My Business
Using Google My Business, you can let customers know when your business location is open. To add or change your business hours on Google:
- Sign into your GMB account and click the Info tab from the Menu.
- On your Info page, look for the “Add hours” options or the section showing your current operating hours.
- Click on the Hours icon, which resembles a clock. Click on the days that your location is open to customers.
- For each day that you are open, select the opening and closing hours.
- Finalize the hours by clicks Apply.
Add Holiday Hours on Google My Business
You can also indicate holidays hours for each location. To do so:
- Sign in to Google My Business. If you have multiple locations, open the location you’d like to manage.
- On the info tab, click the “Special hours” section. You’ll only see this section if you already provided regular hours.
- Click “Confirm hours” next to an upcoming holiday, or click “Add new date” to choose a different date.
- Enter the opening and closing times for that day. Select “Closed” to indicate that the location is closed all day. If you’re open 24 hours, click “Opens at” and select “24 hours” from the dropdown menu that appears. If you enter closing hours past midnight, make sure to set them properly.
- When you’ve finished entering all of your special hours, click “Apply.” Your special hours will appear to customers on Google only for the designated days.
It’s a good idea to confirm your hours for official holidays even if those hours are the same as your regular hours. This way, you’ll make it clear to customers that your holiday hours are accurate. Keep in mind that special hours can only be entered if you’ve already provided regular hours.
Google My Business Posts
Your Google business listing also acts as a content feed through which you can create and post up-to-minute content for your audience. The content can be in the form of text, video, or photo, which customers will see when they find your business listing on Google. To create and publish Google My Business posts:
- Sign in to Google My Business. If you have multiple locations, open the location you’d like to manage. (Currently, posting is only available for individual business locations, which means that you cannot post content in bulk; you’ll have to create and post location-level content for each location you’re managing on Google My Business.)
- Click “Posts” from the menu.
- The “Create post” screen appears. Choose which type of post you’d like to create from the following options: Update, Event, Offer, or Product.
- Add photos, videos, text, events, or offers to your post.
- Click Preview to see a preview of your post. If you’re happy with your preview, click Publish in the top right corner of the screen. If you’d like to change your post, click Back on the top left of the screen to continue editing your draft until it’s ready to publish.
Add the Google My Business Bookings Feature
Google My Business also has a Bookings feature called Reserve with Google that allows businesses that use a supported scheduling partner to see insights and other information on the bookings received from Google. The Bookings feature is available in the U.S. for restaurants and businesses in the fitness or beauty vertical that use a supported scheduling partner. If it is available, go to the Home menu for a listing and look for the “Bookings” card: 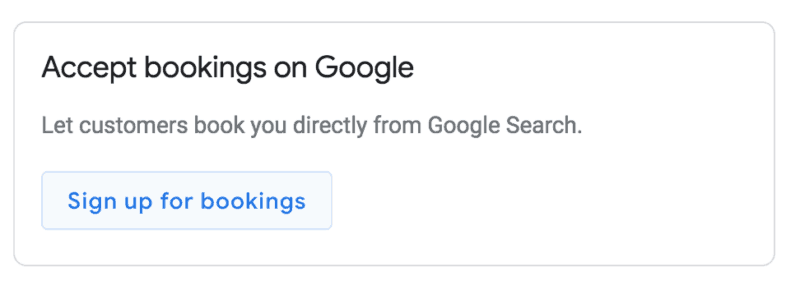 Here is a list of Google’s booking or scheduling partners:
 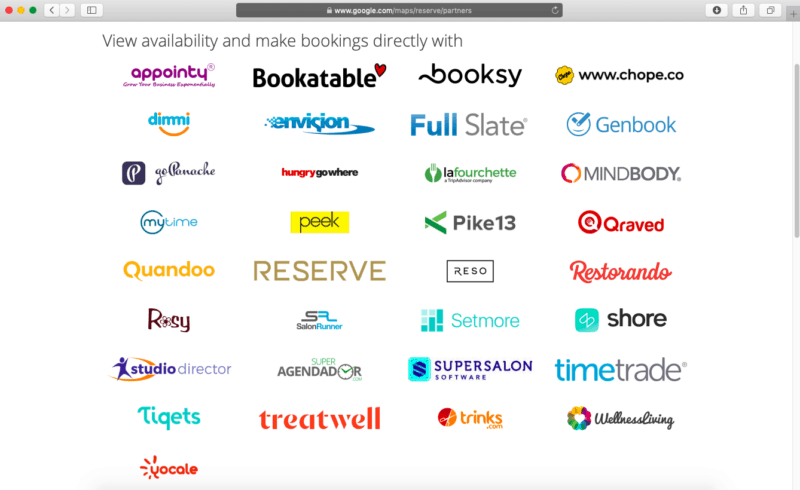 To add this feature to your Google My Business account:
- Sign into Google My Business. For brands with multiple locations, click on the specific location to activate bookings for it.
- Click on the “Bookings” option within that location and sign up with the booking provider of your choice.
- Sign up with the provider of your choice.
- Within one week, your scheduling account is automatically linked to your Google My Business account.
After linking, you can receive bookings through Google. If you already use a scheduling provider, you’re automatically eligible to receive bookings. You’ll see your booking history with that provider for bookings made in Reserve with Google in your Google My Business account on the bookings tab. Note: Your scheduling provider may apply fees for booking through Google. Check with your provider for more details.
Generate Leads Using Google My Business
There’s a lot to say about lead generation and Google My Business. We recommend you read the in-depth guide to learning about using Google business to generate leads. But for starters, you’ll want to make sure you get the most out of your GMB account by taking these steps:
- Connect Google My Business with Google Analytics
- If you have multiple locations, make sure each location’s “website” link sends users to the page for that specific location and not your brand’s home page.
- Add a UTM parameter to track the traffic coming to your website through your GMB listing.
- Optimize a listing for lead capture by including (if possible) integrations for:
- Making reservations
- Placing an order
- Scheduling an appointment
- Make sure the website you link on your listings is optimized to convert GMB traffic by including multiple calls to action including:
- Setting a reservations
- Contact you
- Visit the business
- Track the leads through GMB Insights with specific metrics such as:
- Number of web visitors getting directions to your business
- Number of phone calls
Turn On Messaging and Chat with Customers
Google My Business allows you to chat directly with customers who find your business listing on Google Search. Responding to customers can help you answer their questions, tell your business’s story, and attract more people to your location. Please note that messaging or chatting with customers is a new Google My Business feature that’s currently available in select countries.
Turn On Messaging via SMS
To turn on messaging with customers:
- Sign in to Google My Business and look for the “Messages” card in the Home menu.
- Click on the “Settings” button within the “Messages” tab to turn messaging on or off. For new GMB users, just click the “Turn on messaging” option.
Questions and Answers
As the listing’s manager, you have the most reliable answers to your customers’ questions. So it makes sense that you will want to be the one to receive and respond to these questions every time someone sees your business information on Google.  With Google My Business Questions and Answers, you can ask or answer questions from any device, and from Google Maps on Android devices. Unfortunately, listing managers don’t get any notification letting them know when there are new questions being asked about a location. That means you’ll have to stay vigilant and check your listings as they appear on Google or look inside your GMB info for each location to see if there are any new Q&As. To check for any new Q&As and to answer any outstanding questions:
- In the info card for the place on the right, under “Questions & answers,” click See all questions.
- Next to the question, click Answer.
- To edit or delete your answer, click More and then click Edit or Delete.
The person who asked will get a notification after you’ve answered.
Fix Incorrect Business Information on Google
Sometimes you’ll find that the information in your Google listing is out of date, inaccurate, or incomplete. It could be that your listing was created originally by a Google user but hadn’t been verified. Or the business might have moved locations. Or you’re taking over an existing listing in order to correct a few errors.
Ensuring that your business information on Google is accurate and up-to-date should be part of your online marketing and local search strategy. A simple search can help you quickly identify any inaccuracies or incorrect information about your business online. To fix your business information on Google:
- Add your business listing.
- Verify your business listing.
- Edit your business information.
Once you’ve added and verified a listing, editing your listing should be as simple as clicking the pencil icon in the “Info” section for each listing. 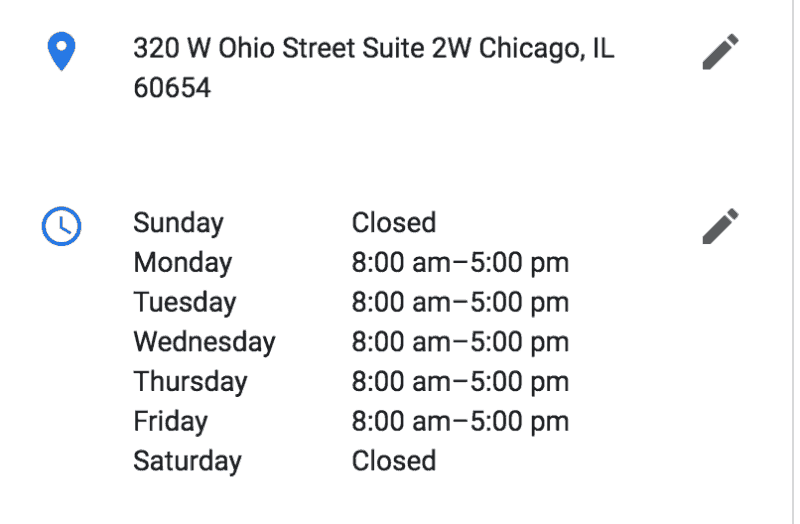 If you’ve begun the verification process and need to fix incorrect business information while waiting for your verification postcard to arrive, you can also report a problem in Google Maps.
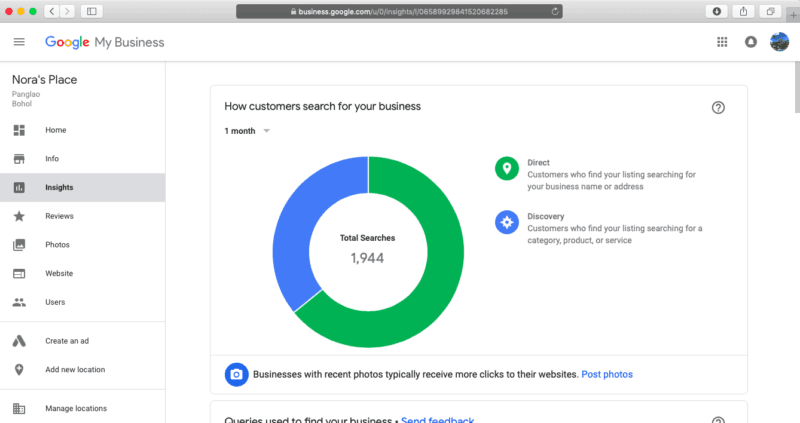
View Insights on Google My Business
Your Google My Business dashboard can give you an inside look at how people find your business listing on the web. Because many customers find businesses on Google Search and Maps, the GMB Insights feature focuses on how customers use Search and Maps to find your listing, and what they do once they find it. You can get Insights for individual listings or in bulk. To access Insights for individual listings:
- Sign in to Google My Business. If you have multiple listings, open the listing you’d like to manage.
- Click Insights from the menu.
 On the Insights page, you’ll be able to see:
- How customers search for your business
- What search queries (keywords) were used to find your business
- Where customers view your business on Google (Search or Maps)
- The most common actions customers take on your listing
- The geographical areas from where customers request directions to your business
- When and how many times customers call your business
- The number of times your photos have been viewed
Managing Reviews on Google
According to online reviews statistics, Google is now the number 1 review site, outpacing other business review sites like Yelp, Tripadvisor, and Facebook in terms of growth in online reviews.
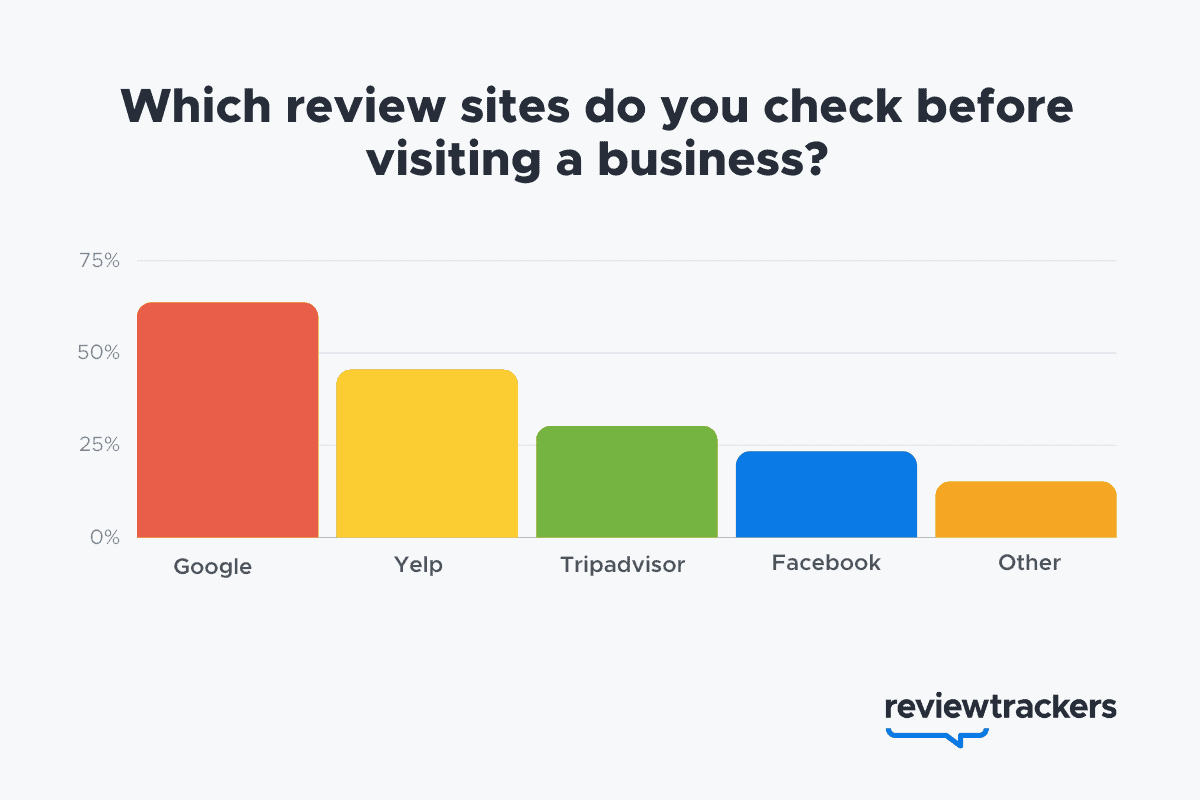
Google reviews significantly influence the way customers think about your business. These reviews can also help or hinder your local search ranking.
By keeping a close eye on your reviews on Google, you can showcase your business in the best possible light and minimize the impact that any negative opinion might have on your business.
For best practices and the most effective strategies and tactics for managing reviews and ratings on Google, check out Google Reviews: The Complete Guide for Businesses.
For Agencies: Setting Up Google My Business
If you work as an agency for multiple businesses and locations, you may register as such on Google My Business. As an agency, you enjoy more robust GMB account management options and tailored support from Google.
Signing Up as an Agency on GMB
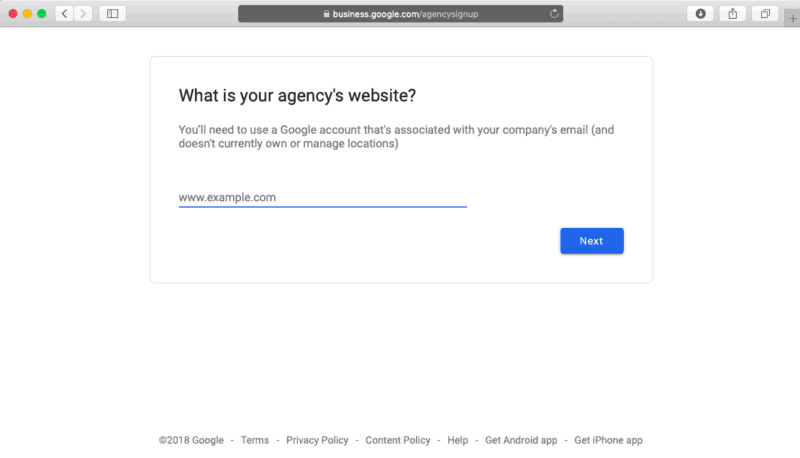
To start the agency registration process navigate to https://business.google.com/agencysignup and enter your agency website URL. You’ll also need to use a Google account that’s associated with your company’s email (and doesn’t currently own or manage locations).
Signing up as an agency for Google My Business gives you access to a GMB account structure that’s designed for third parties to manage all their listings under one account. A Google My Business agency account also gives you the ability to create user groups for managing teams within your agency. After you successfully complete your registration as an agency, you can structure your team and listings from your Google My Business agency dashboard. Here are some of the “buckets” that Google allows you to use to manage users:
- Organization: This is the highest-level profile associated with your agency.
- User group: This is a group to manage users within your agency. User groups can only be created by organization users and can be given access and permission to manage location groups.
- Location group: This is a set of business locations managed by a user group or organization. Location groups can only be created by organization users.
Managing Users
User groups let you create teams of people within your agency to manage specific locations or location groups in your Google My Business agency dashboard. By creating a user group, you’re grouping together people you want to have the same level of access to certain locations. Anyone in your organization can create a user group. You can add people to a user group as owners or members. Here’s a summary of the different capabilities of each role: 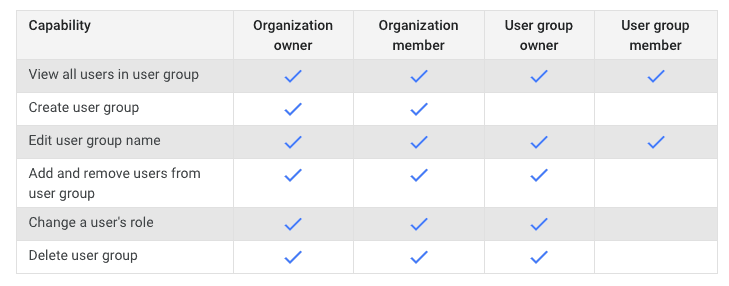 To create a new user group:
- Sign in to your GMB agency account and click Manage users.
- Click Create user group.
- Enter the name of your group, then click Create group.
- Once the user group is created, you can start adding owners and members.
To add owners or members to a user group:
- Add the email address of the user you want to invite. You can invite them to be an owner or member of the user group.
To remove owners or members from a user group:
- Click Manage users.
- Click the menu for the user group and choose Manage.
- Click the X for the person you want to remove, then click Remove.
Managing Location Groups
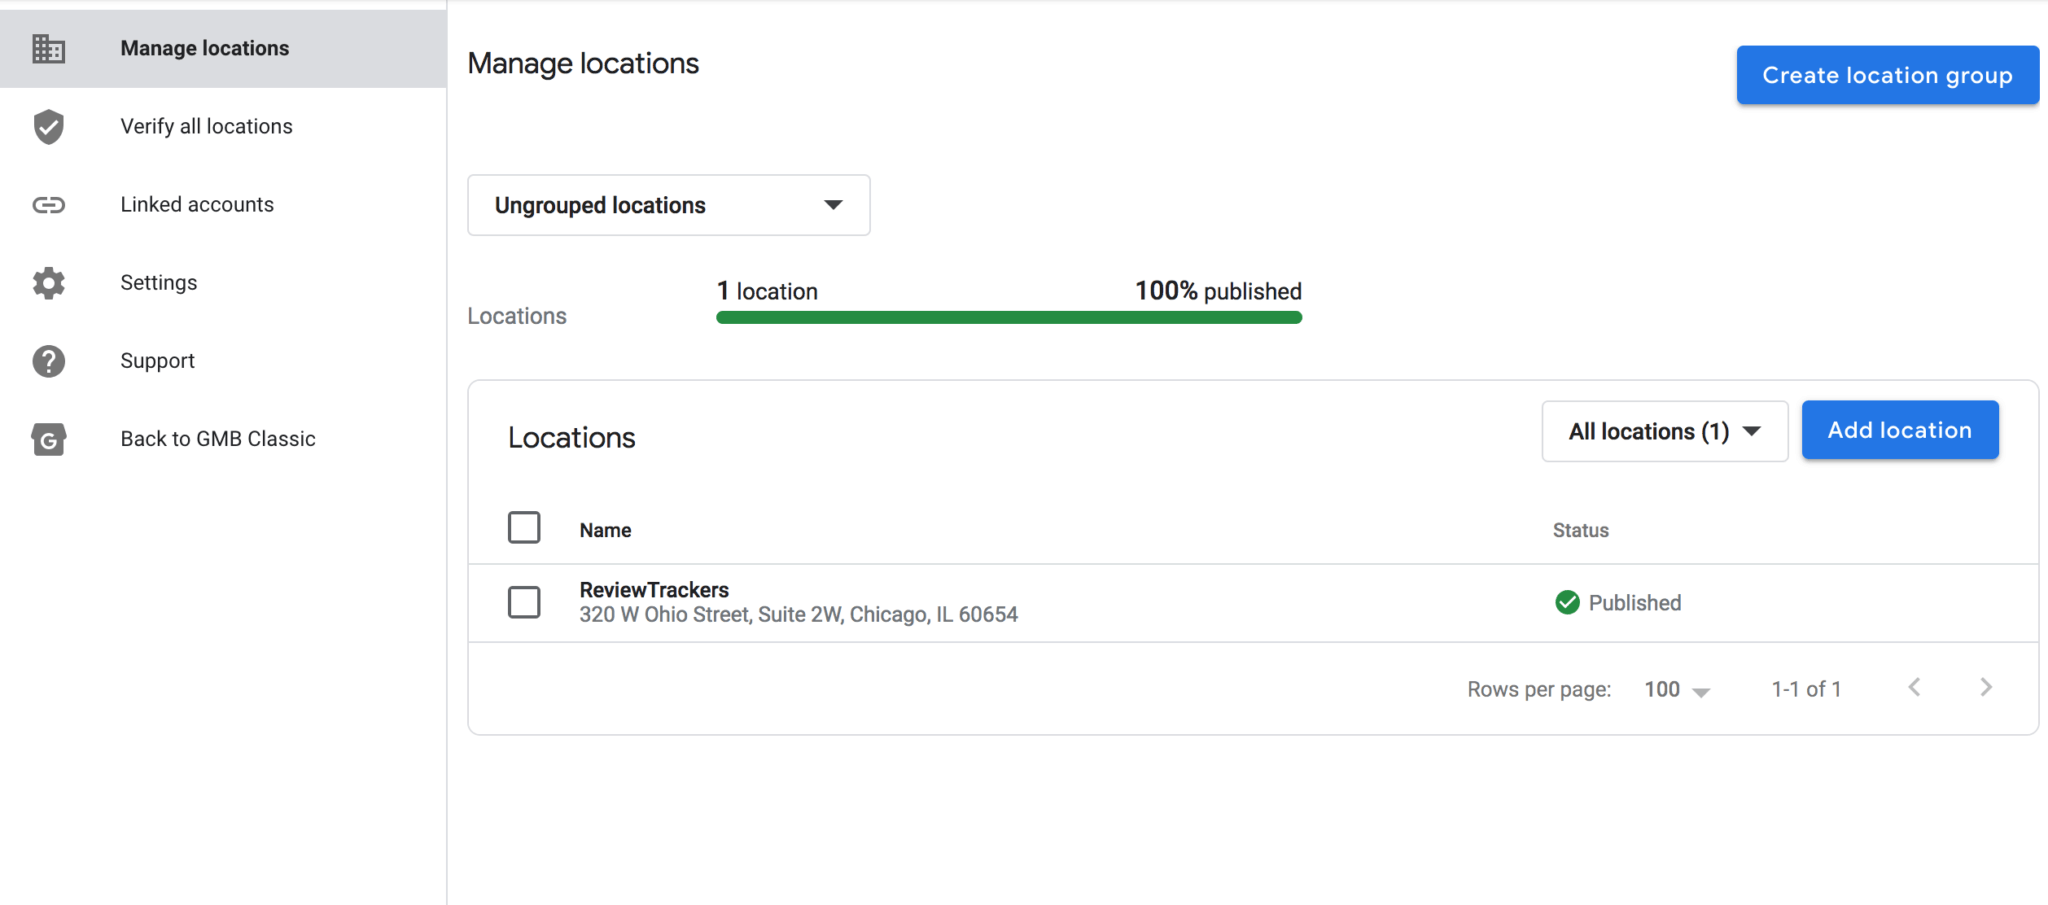
Sorting your locations into groups makes it easier for your agency to manage multiple locations on Google My Business and keep them organized. You can apply changes and share access to multiple listings at once. To create a new location group:
- Click Manage locations.
- Click Create location group.
- Enter the name of your group.
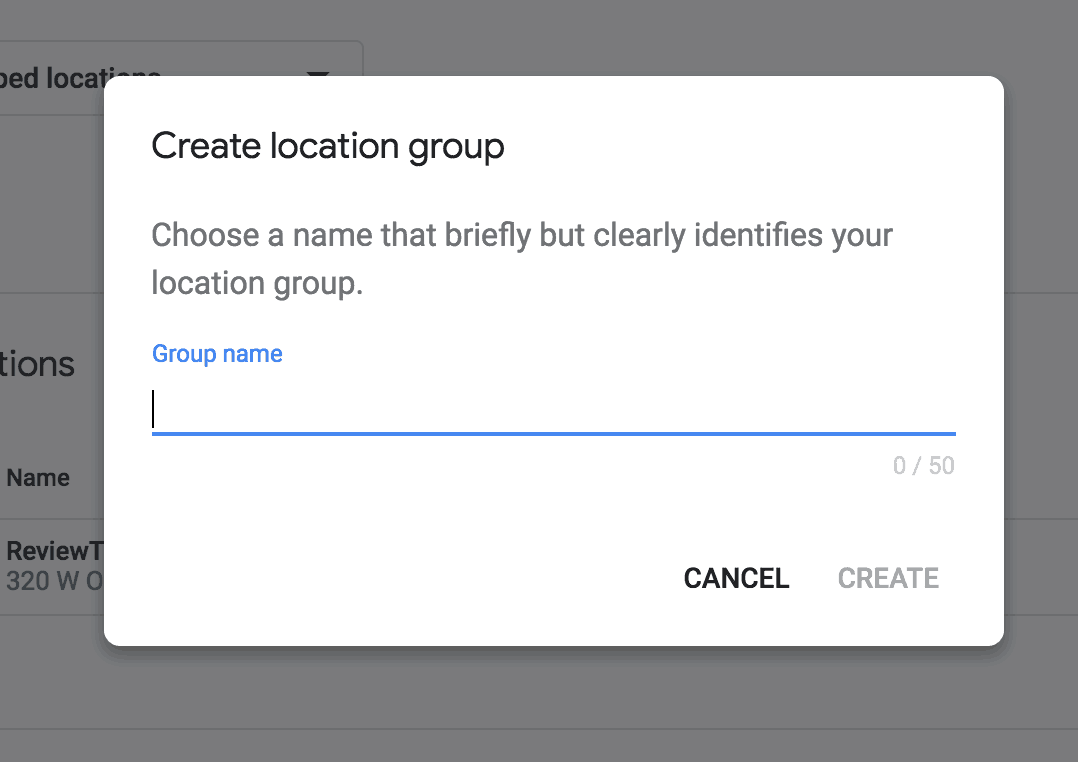
- Click Create.
- Start adding locations.
To add a new location to an existing location group:
- Click Manage locations.
- Use the drop-down menu to choose a location group.
- Click Add location.

- Enter the business name, location, and other details. Follow the prompts to create the new listing.
To allow additional location groups to manage an existing location:
- Click Manage locations.
- Use the drop-down menu to choose a location group.
- Click the location you want to manage.
- Click Users from the menu.
- In the top right corner, click the icon, then choose Add one of your groups. (If you don’t see the icon, this means the location owner hasn’t granted you the appropriate level of access.)
- Choose the location group and role, then click Add.
To transfer existing locations to a location group:
- Click Manage locations.
- Use the drop-down menu to choose a location group.
- Check the box next to each location you want to transfer.
- From the Actions drop-down menu, select Transfer Location.
- Select a location group to transfer the location to, and click Transfer.
Switching from Personal GMB Account to a GMB Agency Account
If you are already registered on Google My Business, but you wish to switch or migrate from a personal account to a GMB agency account, here’s what to do: To migrate a single business location to an agency account:
- In your organization account, request access to the location you own in your personal account.
- You’ll need to specify a location group for the location to be added to.
- Sign in to your personal account, then accept the invitation you had just sent from your organization account. This will allow your organization to manage the location in the specified location group.
To migrate multiple business locations to an agency account:
- In your personal account, transfer the locations to a single location group.
- In your personal account, add your organization as an owner of the location group. You’ll need to specify the right organization by entering its 10-digit organization ID.
- In your organization account, accept the invitation. This will allow your organization to manage all locations in the location group.
Once a location is migrated, you may want to remove the location from your personal account. (If you’d like your personal account to be added to an organization, you must first remove or transfer all locations directly owned by your personal account.)
Do More with Google My Business
To get the most out of your GMB account, you also need to be aware of additional Google features that work in tandem with your listing. Taking advantage of some of these features can help your brand stand out from the local competition.
Google Local Guides
Google Local Guides is a global community of the top reviewers on Google. Think of it as Google’s version of Yelp Elite. The more reviews a user writes and posts on Google, the more benefits he or she enjoys. If you get a review from a Google Local Guide, it’s more likely to show up at the top of your reviews when a user clicks on your GMB listing. That may be because Google gives special preference to Google Local Guide reviews, or simply because these reviews tend to be longer and include photos. 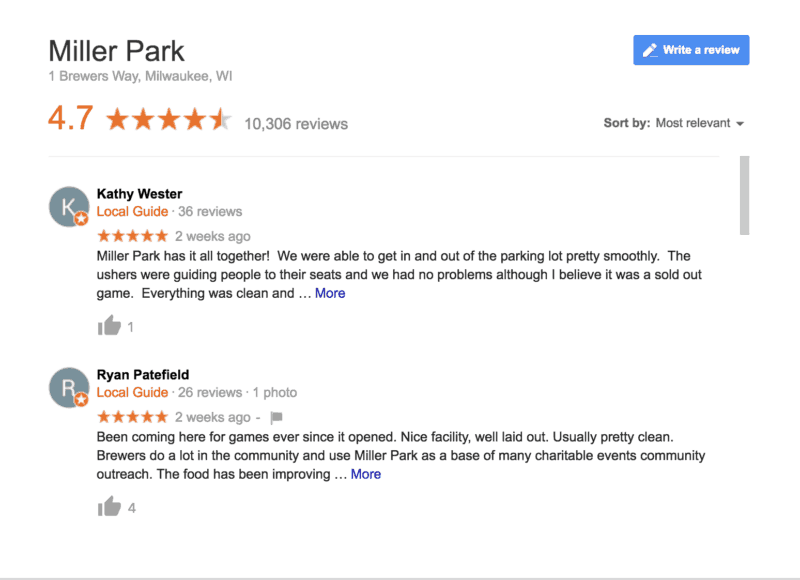 Benefits of the Local Guides program include: special badges and levels, access to a monthly newsletter, invites to members-only contests, the ability to join Hangouts with worldwide tastemakers, connoisseurs, and Googlers, eligibility to test new Google products and services before public release, invites to exclusive events, parties, and meetups, and annual thank-you gifts for high-quality contributions to Google Maps.
High-level Google Local Guides also get the chance to be featured on Google, Facebook, and Twitter. If you’re a business owner, you can still become a Local Guide, provided that you do not solicit Google reviews for a particular business, and that you don’t take advantage of the program for self-promotion.
What is Google Local, Google Places, and Google+?
These are the old names or brands Google used to refer to its services for businesses looking to manage their business information on Google. If you previously used Google Local, Google Places for Business, Google+ Local, or Google+ Pages Dashboard to manage your business information, your account has been automatically upgraded to Google My Business.
Google My Business App for Mobile
You can also access and manage your GMB account using the Google My Business app for iOS and Android. With the Google My Business app, you can:
- Update your listing information in the “Profile” tab
- Use the “Post” button to create events as well as publish content and photos
- Respond to customer reviews or give special offers in the “Customers” tab
- Check out customer insights on where and how many people are searching for you
- Set up to receive notifications when customers are talking about your business
For more information, check out our business owner’s guide to the Google My Business app.
Add Your Business on Google Maps
If a business you own or manage isn’t appearing in Google Maps, you can add and claim your business listing using Google My Business. Once you’ve verified your business, you can edit business information like address, map location, contact information, category, and photos. As a Google user, you can also fix someone else’s local business. You can suggest an edit, report the error, or add a missing place in Google Maps. If someone else’s business is missing from Google Maps, you can add a missing place.
The Local 3 Pack
One of the most prominent and sought-after positions in Google’s local search results is the Google Maps Pack. Also commonly known as the “local pack” or the “3 pack,” Google Maps Pack is a set of three highlighted Google-Maps-based results (it used to be seven) featuring the most highly ranked businesses based on the factors that determine local ranking (reviews, local citations, etc.). Up to three businesses are featured in Google Maps Pack results, but sometimes, you’ll see a sponsored result displayed alongside or above the three organic ones. 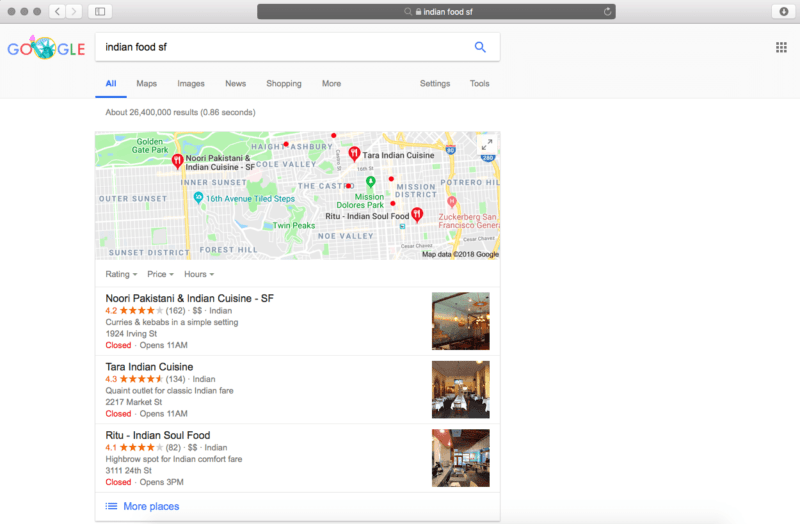 As you can see, Google provides crucial information about each of the businesses organically featured in the Google Maps Pack: overall ratings, a short business summary, location address, business hours, price range, etc. — plus a featured photo on the right side. The “local pack” or “3 pack” is also displayed above traditional text-only or links-based search results — making it one of the most valuable pieces of online real estate across any platform. In fact…
The Google Pack grabs as much as 44% of the total clicks on search engine results pages.
How to Get Your Locations in the Local 3 Pack
The first step to making your business appear as part of the local pack is to claim your business listing on Google and manage your information using Google My Business. But once you’ve done that, you make be wondering what’s next? The next step is to optimize your reviews. Generally speaking, locations that don’t have at least 4 stars won’t show up in the Local 3 Pack. But it’s not enough to have high aggregate ratings. You’ll also want to:
- Have a steady influx of reviews (recency is a significant factor).
- Have positive sentiment in the text of the review itself.
- Have a large number of total reviews (in addition to the trust factor, this allows your business to rank for longtail keywords based on what your reviews are talking about in the text of the review).
If you’re still struggling to appear in the Local 3 Pack, here’s a quick checklist to help you determine if your GMB listing is on point:
- Use your actual business name, but don’t stuff it with keywords or your city name.
- Correct inaccuracies or errors in your data, and get rid of any duplicate listings.
- Be as detailed as possible when entering your business information. Include your business name, category, map location and service area, phone number, website URL, hours of operation, etc.
- Write original and compelling copy for your Google My Business description.
- Avoid address variations. Meaning: if your location is at “72 Southwest Road,” then stick to that way of spelling it, instead of using, say, “72 SW Rd.” or “72 Southwest St.”
- Use a local number instead of a toll-free number.
- Manage and respond to all your Google reviews.
- Upload high-quality photos to enhance the visual appeal of your listing. (These may appear in search results, too.)
- At all times, make sure your information on GMB is correct, complete, and up-to-date.
Remember: business listings that have been claimed and are regularly updated on Google My Business — and which also boast strong reviews and ratings — are the ones most likely to rank at the top of local search and be featured in the Google Maps Pack.